
Contents
|
Control User Access to Program Areas and Accounts Include Capital Gains Distributions on the Realized Gains/Losses Report |
Control User Access to Specific Program Areas and Accounts
Keep your sensitive data secure by controlling user access to specific program areas and accounts in Advisor View.
You do this by creating user groups and then setting up roles and assignments that tell Advisor View which users or groups are allowed to perform certain tasks in the program. If a user is not authorized for certain tasks or program areas, the related menu items or buttons are hidden or disabled.
After you set up roles and assignments, you can set up and assign account sets. Creating and assigning account sets to users tells Advisor View the accounts that users or groups are allowed access.
Set up User Permissions and Account Permissions Using the Permissions Wizard
Advisor View features a Permissions Wizard that guides you through setting up user roles and account permissions. The Permissions Wizard simplifies this process by taking you systematically through all configuration options.
Each page of the wizard presents you with configuration choices. When you are done with a particular page, click Next to move to the next page. Continue navigating through the Permissions Wizard using Next and Back as necessary.
The Permissions Wizard guides you through the following functions:
|
Creating Roles and Adding Permissions |
To start the Permissions Wizard, on the Setup menu, click Permissions, and then click Start setup wizard.

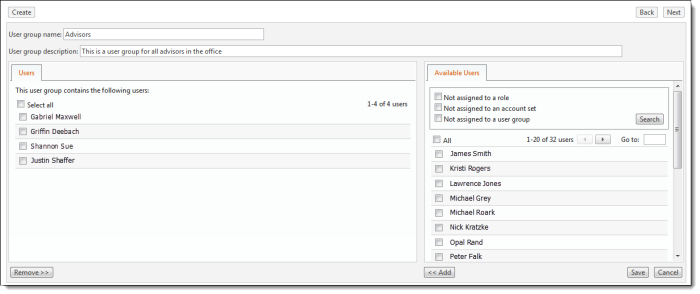
Creating User Groups
When you open the Permissions Wizard, the User Groups page appears. A User Group is a collection of users that all have the same permissions and account access. A user can be a member of more than one User Group. By creating a User Group, you can avoid setting the same permissions for multiple users one by one.
To create user groups and add users to the group, follow these steps:
-
From the User Groups page of the Permissions Wizard, click Create.
-
In the Name box, type a name for the User Group.
-
In the Description box, type a description of the user group.
-
Under Available Users, select the users you want to add to the group and then click Add.
-
When finished adding users, click Save.
-
Click Next to continue to the Roles page of the Permissions Wizard.
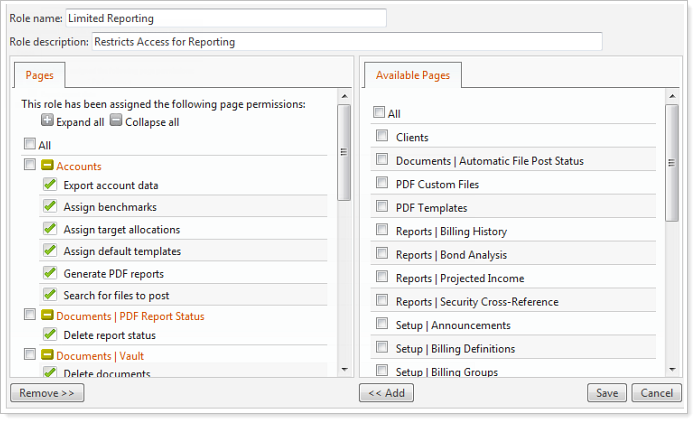
Creating Roles and Adding Permissions
On the second page of the Permissions Wizard, you can create roles and add permissions. A role defines the set of tasks that a user or user group is allowed to perform. When you create a role, you can choose which permissions to assign.
To create roles and add permissions, follow these steps:
-
On the Roles page of the Permissions Wizard, click Create.
-
Click Create.
-
In the Name box, type a name for the role.
-
In Description box, type a description of the role.
-
Under Available Pages, click the pages you want to grant to the role and then click Add. When adding a page, read only permissions for the page are granted by default. Full control permissions are defined by the check boxes below the page names.
-
Under Pages, click the permissions for the page that you want to assign to the role.
Example
Let's say you want to grant a user permission to only the Account Performance report. To do this, you would add the Account Performance page to the role for the user. You then have the option of selecting the Export check box. If you do not select this check box, users assigned to the role can perform all tasks on the Account Performance page except for exporting report data.
-
When finished setting up the roles, click Save.
-
Click Next to continue to the Assign User Groups/Users to Roles page of the Permissions Wizard.
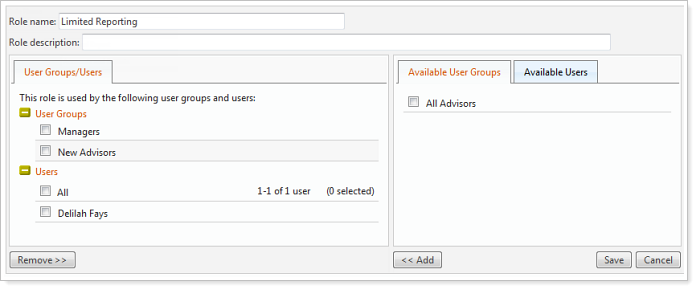
Assigning Users and User Groups to Roles
On the Assign User Groups/Users to Roles page of the Permissions Wizard, you can assign users and user groups to a role.
To assign users and user groups to roles, follow these steps:
-
On the Assign User Groups/Users to Roles page of the Permissions Wizard, click Edit next to the role where you want to assign users.
-
Select the users and user groups you want to assign to the role and then click Add.
-
When finished assigning users and user groups to the role, click Save.
-
Click Next to continue to the Account Sets page of the Permissions Wizard.
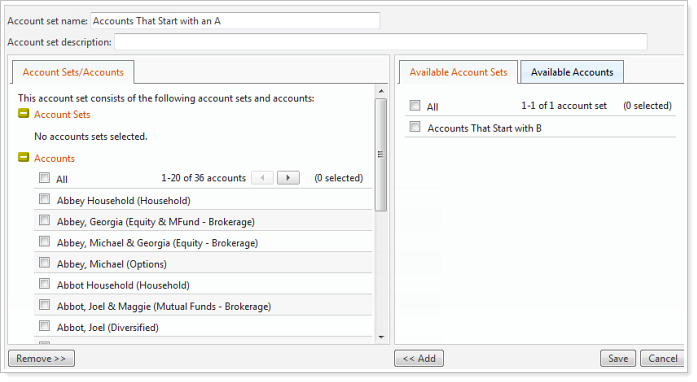
Creating Account Sets
An account set is a collection of accounts and groups that a user may access. An account can be a member of more than one account set. By creating an account set, you can avoid granting users access to multiple accounts one by one.
Tip
If your firm has multiple advisors, you can create accounts sets for each advisors' specific set of accounts. You can then limit access so that each advisor can only access his or her accounts. If an advisor wants to share information with an assistant, the assistant can be given access to the same account set as the advisor.
To create account sets, follow these steps:
-
On the Account Sets page of the Permissions Wizard, click Create.
-
In the Account set name box, type a name for the account set.
-
In the Account set description box, type a description for the account set.
-
On the Available Accounts tab, choose the accounts you want to add to the account set and then click Add.
-
When finished creating the account set, click Save.
-
Click Next to continue to the Assign User Groups/Users to Account Sets page of the Permissions Wizard.
Notes
-
Defining an account set may require account performance to be recalculated.
-
To view the accounts that are not assigned to an account set, select the Not assigned account set check box.
-
By default, all users will have access to all accounts.
Assigning Users and Groups to Account Sets
To assign users and groups to account sets, follow these steps:
-
On the Assign User Groups/Users to Account Sets page of the Permissions Wizard, click Edit next to the account set that you want to assign to users.
-
Select the users and user groups you want to assign to the account set and then click Add.
-
When finished assigning account sets to users and user groups, click Next to continue to the Wizard Summary page.
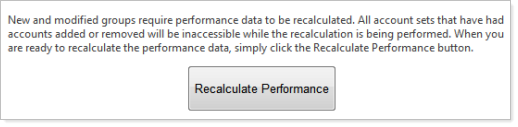
Recalculating Performance
In most cases, setting up user groups and account sets will require you to recalculate performance data. When you make a change to a user group or account set, a Recalculate Performance button will appear on the Wizard Summary page of the Permissions Wizard. To recalculate performance, simply click the Recalculate Performance button. All account sets that have had accounts added or removed will be inaccessible while the recalculation is being performed.
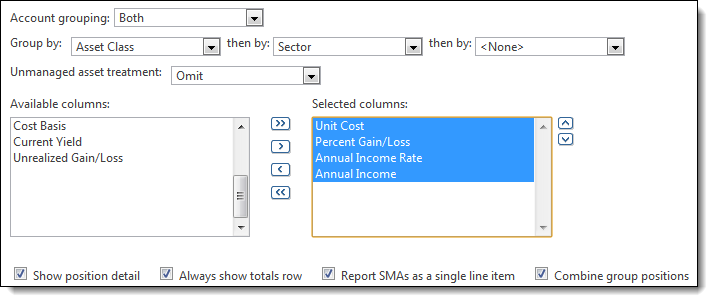
New Holdings Report Columns
We've added the following columns to the Holdings report:
-
Annual Income Rate
-
Annual Income
-
Unit Cost
-
Percent Gain/Loss
Add the New Columns to the Dynamic Holdings Report
To add the new columns to dynamic Holdings report, follow these steps:
-
On the Reports menu, click Holdings.
-
Click Edit.
-
In the Columns list, select the columns you want to add to the report.
-
Annual Income Rate
-
Annual Income
-
Unit Cost
-
Percent Gain/Loss
- Click Apply. The new columns will appear on the report.
Add the New Columns to a PDF Template
To add the new Holdings columns to a PDF template, follow these steps:
-
On the PDF Templates menu, click Templates.
-
In the Select a template list, choose the PDF template you want to modify. If you haven't created a PDF template, choose Create new template.
-
In the Add a section list, click Holdings and then click Add.
-
Choose the columns you want to add to the report. The new columns are:
-
Annual Income Rate
-
Annual Income
-
Unit Cost
-
Percent Gain/Loss
To add a column to the report, in the Available box, click the column you want to add and then click >.
To remove a column from the report, in the Selected box, click the column you want to remove and then click <.
To add all available columns to the report, click >>.
To remove all columns from the report, click <<.
Use the ˄ and ˅ buttons to arrange the columns.
Click Save.
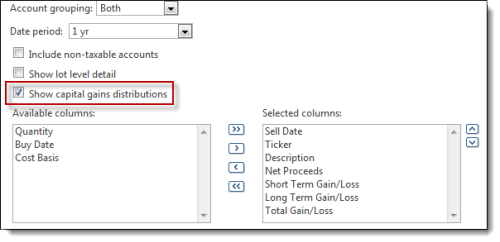
Include Capital Gains Distributions on the Realized Gains/Losses Report
You now have the option to include capital gains distributions on the Realized Gains/Losses report.

Add Capital Gains Distributions to the Dynamic Realized Gains/Losses Report
To add capital gains distributions to the dynamic Holdings report, follow these steps:
-
On the Reports menu, click Realized Gains/Losses.
-
Click Edit next to the Select Realized Gains/Losses View list.
-
Select the Show capital gains distributions check box.
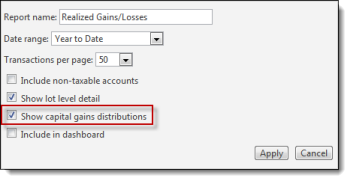
-
Click Apply.
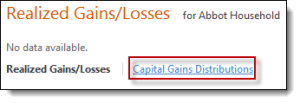
-
Click Capital Gains Distributions.
Add Capital Gains Distributions to the Realized Gains/Losses PDF Template
To add the capital gains distributions to a PDF template, follow these steps:
-
On the PDFTemplates menu, click Templates.
-
In the Select a template list, choose the PDF template you want to modify. If you haven't created a PDF template, choose Create new template.
-
In the Add a section list, click Realized Gains/Losses and then click Add.
-
In the Realized Gains/Losses sectiontitle section, select the Show capital gains distributions check box.
-
Click Save.
New Default Performance for "Rolled Up" SMAs
Based on user feedback, SMAs are now reported as a single line item. Before this enhancement, SMAs were not reported as a single line item.