
Contents
|
Custom Email Subjects and Display Name View the Current Yield and Annual Income on the Holdings Report Set Filters Available on the Accounts Page View Realized Gains and Losses With Lot Level Detail |
Custom Email Subjects and Display Name
You can now customize the display name and subjects that appear on email messages sent from Advisor View.
To customize the email display name and message subjects, follow these steps:
-
On the Setup menu, click Options.
-
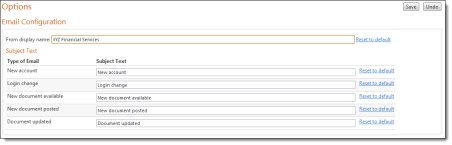
Complete the following fields:
| Field | Description |
|---|---|
|
From display name |
The name that appears on email messages sent from Advisor View. Changing the display name does not update the email address used to send the message. |
|
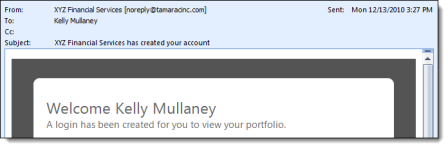
New account |
An email message with this subject is sent to a client when you activate his or her account. |
|
Login change |
An email message with this subject is sent to a client when you reset his or her portal password. |
|
New document available |
An email message with this subject is sent to a client when you post a new document to the portal. |
|
New document posted |
An email message with this subject is sent to you when a client posts a new document to the portal. Advisor View adds the client's user name to the end of the subject line. |
|
Document updated |
An email message with this subject is sent to a client when you update or modify a document on the portal. |
-
Click Save.
Note
To reset an email subject to its original value, click the associated Reset to default link.
View the Current Yield and Annual Income on the Holdings Report
You can now add the current yield and annual income to the dynamic Holdings report and the PDF templates.

Add Current Yield and Annual Income to the Dynamic Holdings Report
To add the current yield and the annual income to the dynamic Holdings report, follow these steps:
-
On the Reports menu, click Holdings.
-
Click Edit next to the Select Holdings View list.
-
To add annual income to the report, select the Annual Income check box. To add the current yield to the report, select the Current Yield check box.

-
Click Apply. Advisor View adds the columns to the report.
Add Current Yield and Annual Income to the Holdings Report PDF Template
To add the current yield and the annual income to a PDF template, follow these steps:
-
On the PDF Templates menu, click Templates.
-
In the Select a template list, choose the PDF template you want to modify. If you haven't created a PDF template, choose Create new template.
-
In the Add a section list, click Holdings and then click Add.
-
In the Holdings section title section, do the following:
-
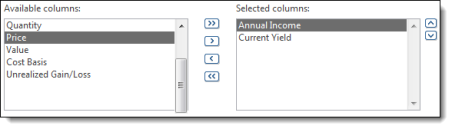
Click Current Yield in the Available columns box and then click >.
-
Click Annual Income in the Available columns box and then click >.
-
-
Click Save.
Set Filters Available on the Accounts Page
If you use sets in PortfolioCenter, you can now view them in Advisor View.
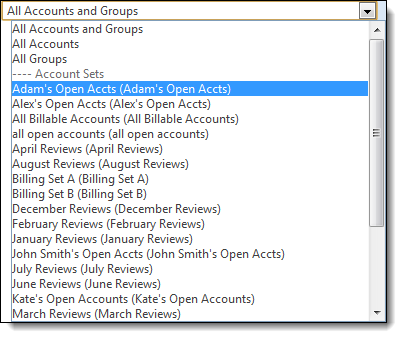
Sets are groups of accounts that you can organize to help with portfolio management and global reporting. Once you've set up the sets in PortfolioCenter, they'll be available in Advisor View the next time you synchronize data. To learn more about synchronizing data in Advisor View, see the Dynamic Reporting User Guide.
After you've synchronized data, click Accounts in Advisor View. The sets appear in the View list. Simply click the set you want to view and Advisor View only shows the accounts associated with the set.
View Realized Gains and Losses With Lot Level Detail
When you view realized gains and losses, you can now see the lot level detail. This enhancement makes it easy to comply with IRS requirements for listing gains and losses.
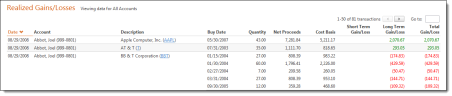
Add Lot Level Detail to the Dynamic Realized Gains and Losses Report
To add lot level detail to the dynamic Realized Gains and Losses report, follow these steps:
-
On the Reports menu, click Realized Gains/Losses.
-
Click Edit next to the Select Realized Gains/Losses View list.
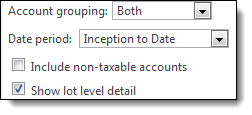
-
Select the Show lot level detail check box.
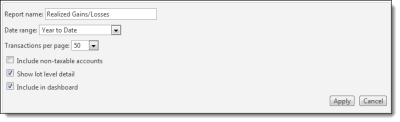
-
Click Apply.
Add Lot Level Detail to the Dynamic Realized Gains and Losses PDF Template
To add lot level detail to a PDF template, follow these steps:
-
On the PDF Templates menu, click Templates.
-
In the Select a template list, choose the PDF template you want to modify. If you haven't created a PDF template, choose Create new template.
-
In the Add a section list, click Realized Gains/Losses and then click Add.
-
In the Realized Gains/Losses section title section, select the Show lot level detail check box.
-
Click Save.
Customizable Display of Returns
You now more control over how performance returns are presented at the security level. With this enhancement, you can now address the effect of fees that are withdrawn from specific cash holdings by choosing custom settings for each cash security. You can configure Advisor View to display returns gross of fees, without a return or default to the return parameters for the portfolio (gross or net of fees). Cash return settings are assigned per individual cash security, which allows differentiation of sweep cash for fees that are modeled in the asset allocation.
In addition, you can choose how cash security returns should be applied to returns for a particular category - for example, the returns of a cash security can be excluded or included gross of fees into the performance calculation of an asset class.
To customize the display of cash returns on the Account Performance report, follow these steps:
-
On the Setup menu, click Cash Settings.
-
Select the options you want:
| Field | Description |
|---|---|
|
Security return |
|
|
Use report setting |
When you select this option, Advisor View defaults to the performance calculation setting for the portfolio. |
|
Always show gross return |
When you select this option, Advisor View does not use the return display setting for the portfolio and always displays security returns that are gross of fees.
|
|
Do not show return |
When you select this option, Advisor View does not display performance returns for the security.
|
|
Category return |
|
|
Use report setting |
When you select this option, Advisor View calculates category (i.e. asset class, sector, etc.) returns based on the performance calculation setting for the portfolio (gross or net of fees).
|
|
Always show gross return |
When you select this option, Advisor View uses the gross of fees return for a cash security to calculate the category return.
|
|
Do not include in return |
When you select this option, Advisor View excludes the return for the cash security from the return calculation of the category.
|


- When finished, click Save settings.
Customize Returns on the Dynamic Account Performance Report
You can display returns on the Account Performance report as gross or net of fees.
To customize how returns calculate on the dynamic Account Performance report, follow these steps:
-
On the Reports menu, click Account Performance.
-
Click Edit next to the Select Account Performance View list.
-
In the Show returns as list, click Gross or Net.
-
Click Apply.
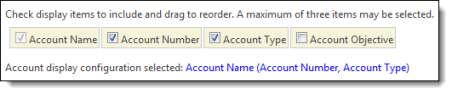
Identify Accounts by Objective and Account Type
If you use account types or objectives in PortfolioCenter, you can now view the information in Advisor View. The account types and objectives make it easy to differentiate between accounts with similar names.

Once you've set up account types and objectives in PortfolioCenter, they'll be available in Advisor View the next time you synchronize data. To learn more about synchronizing data in Advisor View, see the Advisor View User Guide.
After you've synchronized data, click Accounts in Advisor View. The account types and objective columns appear on the page.
Customize How the Account Type and Objective Appear on Dynamic Reports
If you want to customize how the account type and objective appear on your reports, follow these steps:
-
On the Setup menu, click Options.
-
In the Account Display Configuration box, select the columns you want to appear.
-
To change the order that the columns appear, click and hold down the left mouse button on the field you want to move and drag it to the desired location. Release the mouse button.
-
Click Save.
Customize the Account Type and Objective Format on PDF Reports
If you want to customize how the account type and objective appear on PDF reports, follow these steps:
-
On the PDF Templates menu, click Templates.
-
In the Select a template list, choose the PDF template you want to modify. If you haven't created a PDF template, choose Create new template.
-
In the Template settings and name section, use the Single account display format lists to configure the appearance of the account type and objective.

-
If you want to add the account type and objective to the header or footer of the PDF report, follow these steps:
-
Under the header or footer section, in the applicable Line list, click Account Information.
-
Use the Format lists to customize the appearance of the account type and objective.

-
Click Save.