
Contents
Enhanced Realized Gains/Losses Report
We've enhanced the Realized Gains report to make it easier to use by allowing you to add realized gains and losses to your PDF templates. In addition, you can also view non-taxable accounts.
While we were developing these enhancements, we also renamed the report to the Realized Gains/Losses Report to be more consistent with industry standard terminology.
Add Realized Gains and Losses to Your PDF Templates
You can now add realized gains and losses to your PDF report templates. This feature allows you to send your clients quarterly performance reports that include realized gains and losses.
To add realized gains and losses to your PDF reports, follow these steps:
-
On the PDF Templates menu, click Templates.
-
In the Select a template list, choose the PDF template you want to modify. If you haven't created a PDF template, choose Create new template.
-
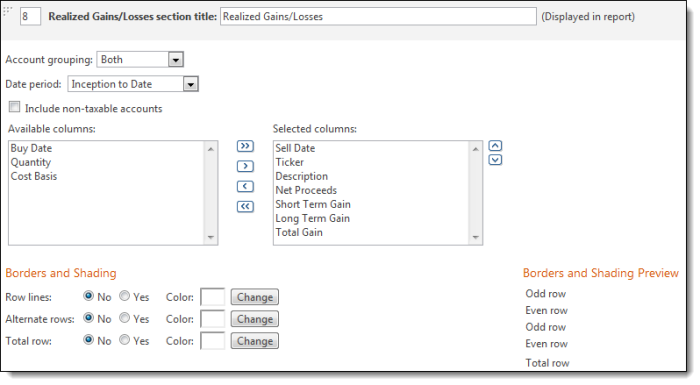
In the Add a section list, click Realized Gains/Losses and then click Add.
-
In the Realized Gains/Losses section title box, type a title for the section.
-
Click Save.
Notes
-
If you want to include non-taxable accounts on the report, select the Include non-taxable accounts check box.
-
The realized gains and losses are aggregated at the position level.
-
For more information on customizing PDF templates, see the Advisor View User Guide.
Non-Taxable Accounts
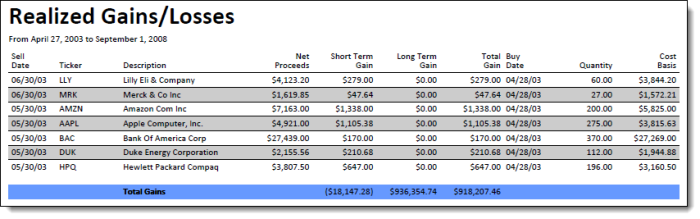
The Realized Gains report now allows you to see non-taxable accounts.
To view non-taxable accounts in the Realized Gains report, follow these steps:
-
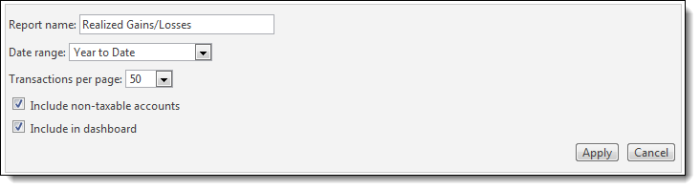
On the Reports menu, click Realized Gains/Losses.
-
Click Edit.
-
Select the Include non-taxable accounts check box and then click Apply.
Notes
-
The realized gains and losses are now aggregated at the position level. Before this enhancement, realized gains were broken down by the original buy lot.
-
We've added a Total Gains row to the Realized Gains/Losses Report.

Custom Indexes
We want to make our indexes as dynamic as possible. That's why we've added support for custom indexes. With custom indexes, you can upload any index data you want.
Before you upload a custom index, you'll need to save the index file as a CSV file. The CSV file should be in the following format: index name, end date, return percentage.
Example of CSV File
|
Simple Index 1 Percent, 09/01/2008, 1 Simple Index 2 Percent, 09/01/2008, 2 Simple Index 2.5 Percent, 09/01/2008, 2.50 |
To upload a custom index, follow these steps:
-
On the Setup menu, click Custom Indexes.
-
Click Browse. Locate and click the custom index file you want to upload, and then click Open.

-
Click Upload.
Assign a Custom Index
Once you've uploaded the custom index, you can assign it to an account by following these steps:
-
Click Accounts.
-
Select one or more accounts where you want to assign the custom index.
-
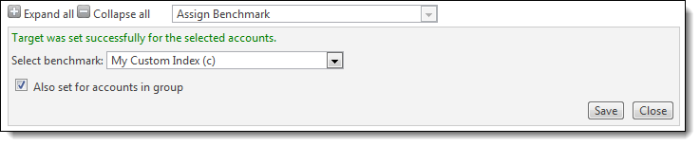
In the More Actions list, click Assign Benchmark.
-
In the Select benchmark list, click the custom index and then click Save.
Notes
-
The custom index file must be saved in CSV format.
-
To delete a custom index, on the Setup menu, click Custom Indexes. Click Delete next to the index you want to delete.
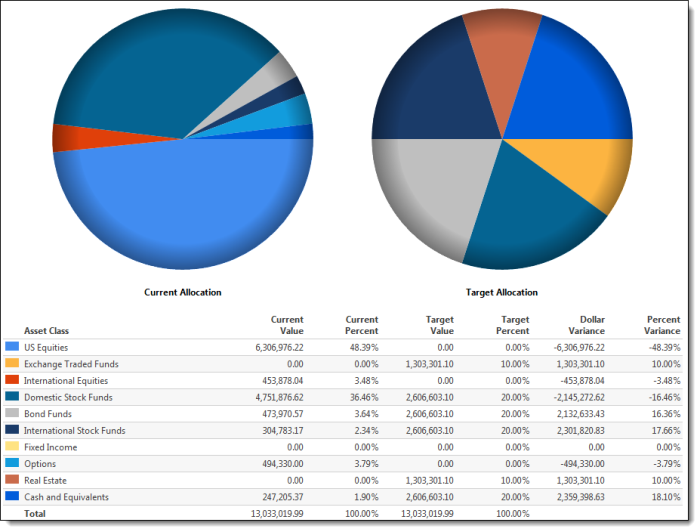
Target Allocation
Use target allocations to track and compare account holdings to account targets. This enhancement makes it easy for you to compare the holding goals at the account and group levels and helps you determine if you need to adjust the holdings based on the investment policy of the portfolio.
Create the Target Allocation
To create the target allocation, follow these steps:
-
On the Setup menu, click Target Allocations.
-
In the Select a target allocation list, click Create new target allocation.
-
In the Target allocation name box, type a name for the target allocation.
-
In the Category type list, choose one of the following:
-
Asset Class
-
Sector
-
Security Type
-
Subsector
-
In the Add an asset class/sector/security type/subsector list, choose the applicable item and then click Add.

-
In the Target Weight box, type the target weight for each item. In the Minimum Weight box, type the minimum acceptable weight for the items. In the Maximum Weight box, type the maximum acceptable weight for the items. Repeat Step 5 and Step 6 until the total amount in the Target Weight column is 100 percent.

-
Click Save.
Assign Target Allocations to an Account
To assign a target allocation to an account, follow these steps:
-
Click Accounts.
-
Select the one or more accounts where you want to assign a target allocation.
-
In the More Actions list, click Assign Target Allocation.

-
In the Select Account Target Allocation list, choose the target allocation you want to assign to the accounts.
-
If you want to assign the target allocation to all accounts in a group, select the Also set for accounts in group check box.
-
Click Save.
Run the Report
You have two options for viewing the report: you can view it from the Reports menu as a dynamic report or you can view it as a PDF report.
View target allocations as a PDF report
To view the target allocations as a PDF report, follow these steps:
-
On the PDF Templates menu, click Templates.
-
In the Select a template list, choose the PDF template you want to modify. If you haven't created a PDF template, choose Create new template.
-
In the Add a section list, click Asset Allocation and then click Add.
-
In the Asset Allocation section title box, type a title for the asset allocation section of the report.
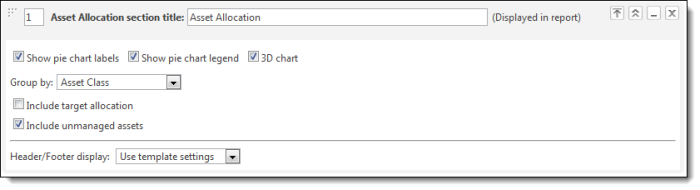
-
Select the Include target allocation check box and then click Save.
-
Click the Accountsmenu.
-
Select the applicable accounts and then click PDF Reports in the More Actions list.
-
In the Select template list, choose the PDF template that includes target allocation.
-
In the As of date box, click the applicable date for the report and then click Generate Report.
View target allocations as a dynamic report
To view the report from the Reports menu, follow these steps:
-
On the Reports menu, click Asset Allocation.
-
In the Viewing data for list, click the applicable account or household and then click Change.
-
In the Select Asset Allocation view list, choose an existing report view. To create a new report view, click <Create New>.
-
Click Edit.
-
Select the Include target allocation check box and then click Apply. The report appears on your screen.
Improved Holdings Report
You now have greater control over how you view the Holdings report. Now you can view separately managed account (SMA) holdings at the group level, or you can view a detailed breakout of the SMA holdings. In addition, you now have the option to view a ticker for each underlying account, or you can view the tickers in aggregate for the group.

To customize the Holdings report, follow these steps:
-
On the Reports menu, click Holdings.
-
Click Edit.
-
Do one of the following:
-
To view the tickers in aggregate for the group, select the Combine group positions check box.
-
To view a ticker for each underlying account, clear the Combine group positions check box.
-
Do one of the following:
-
To view SMA holdings at the group level, select the Report SMAs as a single line item check box.
-
To view a detailed breakout of the SMA holdings, clear the Report SMAs as a single line item check box.
-
Click Apply. The report appears on your screen.
