
Contents
|
Improved Control Over Minimum Trade Size New Support and Training Center Simultaneously Modify the Underlying Accounts Assigned to a Rebalancing Group |
Improved Control Over Minimum Trade Size
In previous releases, Advisor Rebalancing allowed you to specify a minimum trade size as either a fixed dollar amount or as a percentage of account value. However, some users wanted Advisor Rebalancing to use the larger amount - either the percentage amount or the fixed dollar amount. With this release, you can specify a percentage and a fixed dollar amount for the minimum trade size. Advisor Rebalancing will apply the greater of the two values for the minimum trade size.
To check out this feature, follow these steps:
-
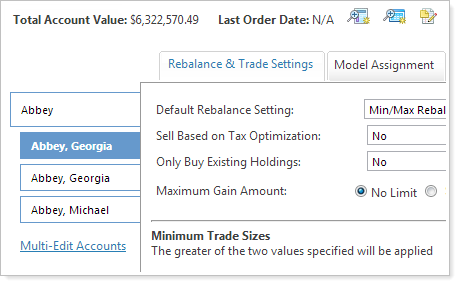
On the Accountsmenu in Advisor Rebalancing, click Account Settings.
-
In the Type account name or number, start typing the name or number of the account where you want to specify a minimum trade size. When you see the account in the list, click it and then click Select.
-
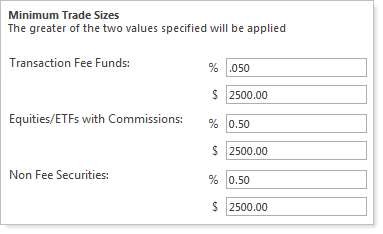
On the Rebalance & Trade Settings tab, under Minimum Trade Sizes, you can specify a percentage and a fixed dollar amount for transaction fee funds, equities and ETF's with commissions, and non-fee securities. Advisor Rebalancing will apply the greater of the two values for the minimum trade size.
-
Click Save.
As a result of this enhancement, we updated the upload data set as follows:
| These columns... | Were replaced with these columns... |
|---|---|
|
TransactionFeeFundMinTradeSizeValueType TransactionFeeFundMinTradeSize |
TransactionFeeFundMinTradeSizeDollar TransactionFeeFundMinTradeSizeWeight |
|
OtherSecuritiesMinTradeSizeValueType OtherSecuritiesMinTradeSize |
OtherSecuritiesMinTradeSizeDollar OtherSecuritiesMinTradeSizeWeight |
|
NonTransactionFeeFundMinTradeSizeValueType NonTransactionFeeFundMinTradeSize |
NonTransactionFeeFundMinTradeSizeDollar NonTransactionFeeFundMinTradeSizeWeight |
New Support & Training Center
As part of our ongoing effort to answer your questions about Advisor Rebalancing, we're introducing the newly designed Support & Training Center. This Support & Training Center will be constantly changing to incorporate the latest cutting-edge technology and product information so you can get the right answers quickly and easily in the way you like to work.
The following is a brief overview of the self-help features this site puts at your command.
-
Help Centers.This is a collection of thousands of detailed articles—updated daily—with information about our products and answers to commonly asked questions.
-
Suggestion box.Send us product ideas, feature requests and thoughts you want to share about Tamarac products.
-
Support Management. We welcome your questions. Send your questions to your Tamarac service team online.
What are some of the improvements we've made?
The Support & Training Center offers many improvements over the previous Advisor Rebalancing Help Center. A few key enhancements include:
-
One site for all products.Find the answers you need for all your Tamarac products in one location. The Support & Training Center combines the Advisor Rebalancing, Advisor CRM, and Advisor View Help Centers into one easy-to-use site.
-
Improved search.Search articles for a specific Tamarac product or search across all products. The new and improved search functionality also offers suggestions for more relevant search terms, stemming (search will match words that are similar or derivatives of each other - for example, searching for rebalance will return results for rebalancing and rebalanced), and wildcard searching.
-
Help feedback.We're always looking to improve the quality of our help and training materials. At the bottom of every article in the Support & Training Center, you can let us know how to improve the article.
-
Consistent look for all articles.Each article follows a consistent format so that you can easily find and skip information with which you're already familiar. Links to related articles are also provided where appropriate.
Please let us know if you have feedback about the new Support & Training Center, as that will help form our next round of improvements. Your tips and best practices for Tamarac products are also most welcome.
Simultaneously Modify the Accounts Assigned to a Rebalancing Group
At our 2010 Tamarac User Conference, several users requested ability to simultaneously make changes to all underlying accounts assigned to a rebalancing group. With this release, with the click of a button you can send the underlying accounts assigned to a rebalancing group to the Accounts page. From the Accounts page, you can quickly make changes to the underlying accounts.
To check out this feature, follow these steps:
-
On the Accounts menu, click Rebalancing Group Settings.
-
In the Type rebalancing group name or ID, type the name or number of the group where you want to make changes to the underlying accounts.
-
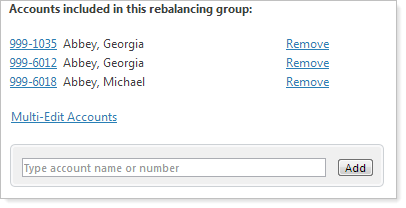
Under Accounts included in this rebalancing group, click Multi-Edit Accounts.
-
On the Accounts page, make the necessary changes to the accounts assigned to the group, and then click Save. For more information on modifying accounts, see Make Changes to Account Settings.
Note
You can also make changes to all accounts assigned to a group from the Account Settings page. From the Account Settings page, browse to an account that is assigned to the group and then click the Multi-Edit Accounts link on the left side of your screen.
Reason For Trade Added to the Bulk Reconciliation Report
Many of you asked to see the reason for a trade on the bulk reconciliation report. In this release, we've added a Reason for Trade column to the reconciliation bulk report.
To see this new feature, follow these steps:
-
On the Reports menu, click Reconciliation Reports.
-
Choose a date range for the report.
-
Select the accounts where you want to run the report and then click Generate Report.
-
In the Generate Report dialog, click Bulk Reconciliation and then click Generate Report. When you open the report, you'll see a new column for Reason for Trade.