
Contents
|
Create an Appointment on Your Calendar Create an Appointment and Invite a Client |
Introduction
There are lots of different ways to create appointments and send those appointments to others. Because some methods have consequences you may not realize initially, below are the best practices we recommend using when creating appointments.
Create an Appointment on Your Calendar
Our recommended best practice is to create appointments in Outlook and then use the Dynamics 365 app to Set Regard the item to the client; this will then sync to CRM.
Create an Appointment and Invite a Client
Tamarac's team now has the ability to update a setting in CRM that will prevent the Appointment description/body from syncing between CRM and Outlook. This means users can add meeting notes to the description of an appointment in CRM with no risk of inadvertently sending this information to the end client.
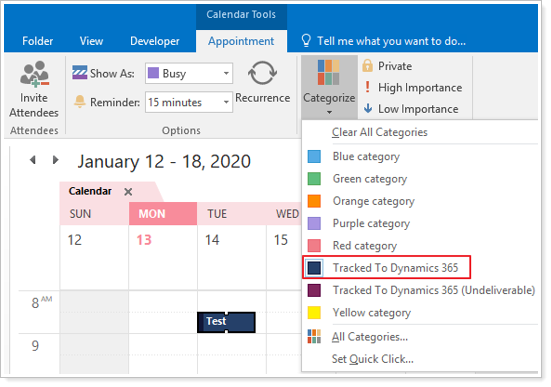
Create an Appointment on Other Users' Calendars
If you are labeled as an editor in Outlook and you can create appointments on others' calendars, the Dynamics 365 app will be grayed out.
In order to have that appointment sync over to CRM, use your Track To Dynamics 365 category. This will tell the system to push the appointment in CRM, but the Set Regard will still be blank.
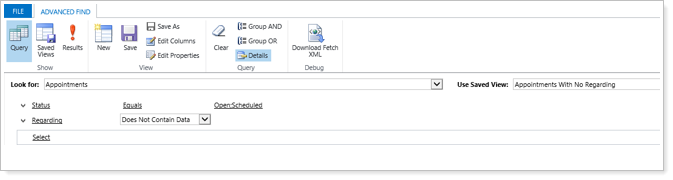
Use the Appointments With No Regarding saved view shown below to find the appointment and Set Regard in CRM. We suggest adding the client name in the subject of the appointment to make sure the Set Regard corresponds to the right record.
Add Process Types to Appointments
Use these steps to create an appointment with the proper process type.
- Create the appointment and Set Regard.
- Click the three dots beside Tracked Regarding.
- Click View Appointment.
- Scroll down to add a Process Type.