
Contents
|
Create a Working List Using an Uploaded Saved Search Add Accounts to a Working List |
Introduction
Working lists are a collections of accounts and/or groups that you create and name for any reason. Working lists appear on Account Set lists throughout Tamarac. Unlike saved searches, working lists don't have to have common characteristics, though you can easily use saved searches to create working lists. Nearly anyone can create a working list, so those users who don't have permission to create account sets can instead create working lists.
Using Working Lists
There are lots of reasons you might want to use working lists, including these:
-
Widely Available.Nearly anyone can create a working list. If you have access to a page that shows accounts, you can create a working list. Administrators can either grant or deny a user's ability to share working lists, however.
-
Flexible.Working lists can be created for any reason. Unlike saved searches, there does not have to be any common characteristics among the accounts and groups in a working list.
-
Customizable.You can save and edit working lists at any time, for any reason. You can also create temporary lists that will go away tomorrow.
-
Connected.Working lists filter pages in conjunction with other filtering, such as letter filtering or saved searches, to narrow down the results you see on a page.
Each account can belong to more than one working list, and you can include both accounts and groups in your working lists, giving you flexibility.
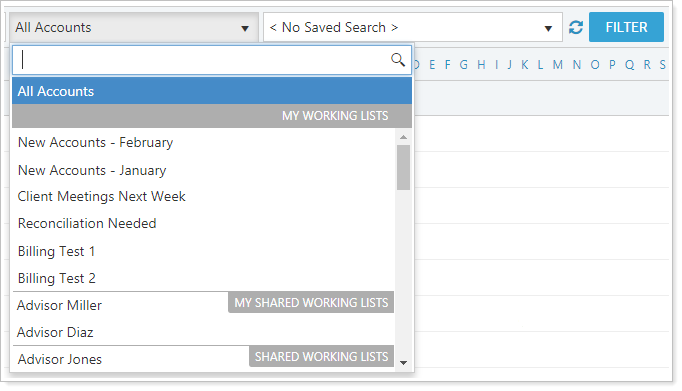
Working lists can be found on the Account Sets list under the following categories:
-
My Working Lists.Working lists you created only for yourself.
-
My Shared Working Lists.Working lists you created and shared with colleagues.
-
Shared Working Lists.Working lists your colleagues shared with you. You will not be able to edit or delete working lists others have shared with you.
When you select a working list or account set on one page, that selection will apply to other pages you navigate to. This lets you quickly filter your work without having to take any additional action.
Working List Availability
Working lists are not available in Find Data For lists or on dynamic reports.
See Working Lists in Action
Kelly is a CSA who has been tasked with preparing information for clients who are coming in today for in-person meetings with the advisor. Kelly creates a working list called Appointments for Today and selects the Save for today only and Share working list options. Kelly then uses the calendar to find all the accounts belonging to those clients with appointments today and adds those accounts to Appointments for Today.
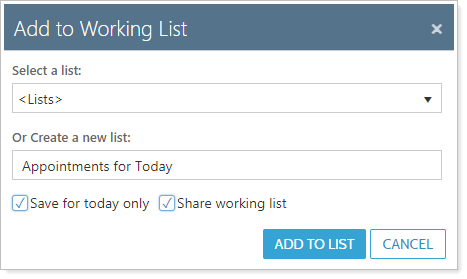
Now, Kelly can select Appointments for Today and filter any page that displays accounts. And because Kelly selected Share working list, the advisor can use that same working list as well.
Tomorrow, this list will no longer be relevant. The Save for today only option erases the working list overnight so it won't clutter Kelly's view or the view of any other user.
Create a Working List
The following sections provide more information on creating new working lists.
Create a New Working List
To create a working list, follow these steps:
-
On the Accounts menu, click Accounts.
-
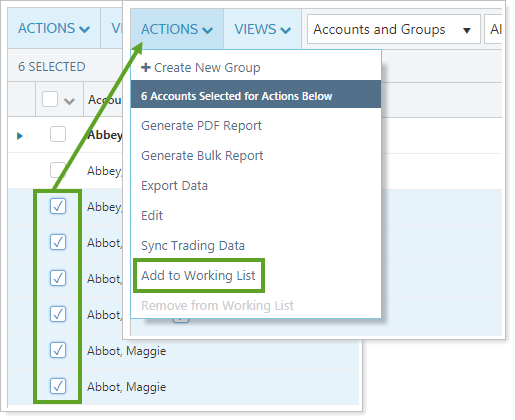
Select the account, multiple accounts, or groups you want to include in the working list.
To find accounts, you can use available filtering such as letter filtering, saved searches, and account sets.
-
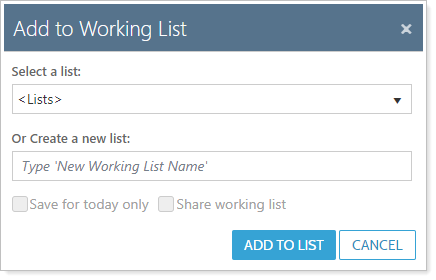
Select Add to Working List on the Actions list. This opens the Add to Working List dialog box.
-
Type the name of the new working list in Create a new list.
If you want the list to disappear after today, select Save for today only. If you want to share the list with colleagues, select Share working list.
Notes
- If you will be the only one using this list, you must use a name you haven't used before. If you are going to share this list with colleagues, you must use a name that nobody else has used.
- If you share your working list, only you can delete that list.
-
Click Add to List.
Your working list will now be available in the Account Set lists.
Create a Working List Using an Uploaded Saved Search
There is no current functionality to upload a working list. An uploaded saved search will be overwritten the next time you upload a saved search. However, if you'd like to continue to use or add to a working list, you can create a working list using this two-step process:
-
Upload a Saved Search. For instructions on how to upload a saved search, see Saved Searches.
-
Use that saved search to create a working list. Once you have a saved search, you can easily use this as the basis of a working list. Then, when you've saved the working list, you can continue to add or remove members as needed.
To create a working list, using a saved search, follow these steps:
-
Upload a saved search. For full instructions on how to do this, see Saved Searches.
-
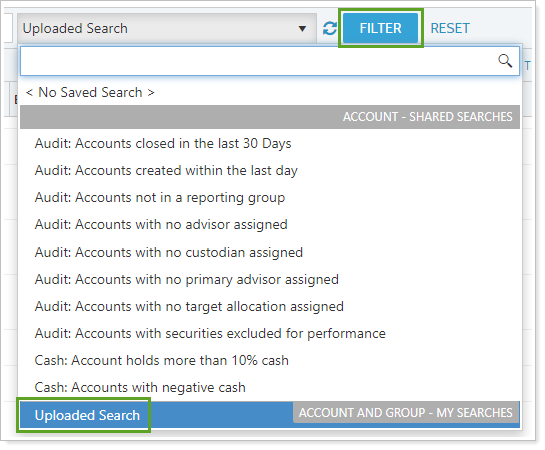
On the Accounts page, filter the page by your uploaded saved search. To do this, select Uploaded Search and click Filter.
-
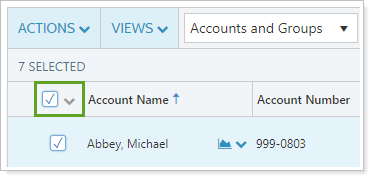
Select all accounts by selecting the check box at the top left corner.
-
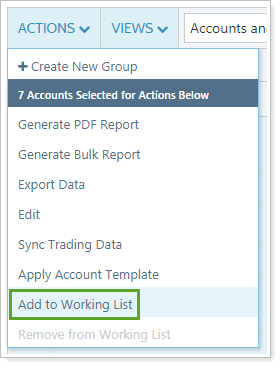
Under Actions, select Add to Working List.
-
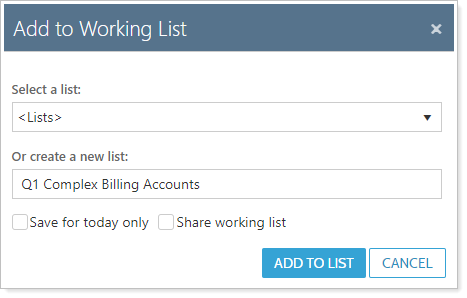
Give your new working list a name. Select Save for today only to only keep this list through today, and select Share working list to share this list with colleagues.
-
Click Add to List. Your list is now available to use. You can add or remove names as needed without the need to create a saved search.
Modify a Working List
You can modify working lists in the following ways.
Add Accounts to a Working List
To add accounts to an existing working list, follow these steps:
-
On the Accounts menu, click Accounts.
-
Select the account, multiple accounts, or groups you want to add to the working list.
-
Select Add to Working List on the Actions list. This opens the Add to Working List dialog box.
-
Select the working list where you want to add this account and/or group in Select a list.
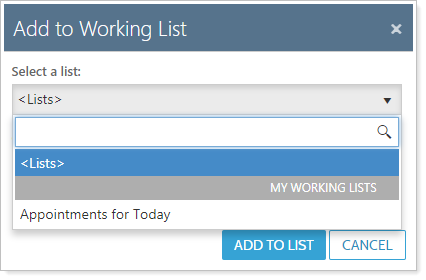
-
Click Add to List.
Remove Accounts From a Working List
To remove accounts form an existing working list, follow these steps:
-
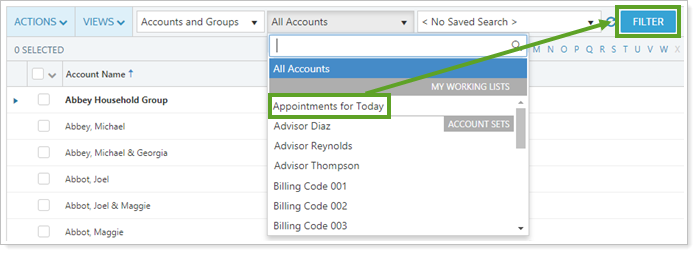
On the Accounts menu, click Accounts.
-
Apply the working list filter to the page you're viewing by selecting the working list and clicking Filter.
-
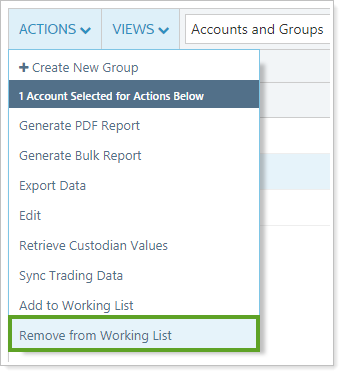
Select the accounts and/or groups you want to remove from the working list.
-
Select Remove from Working List in the Actions list. That account or group will no longer be included in available working lists.
Rename a Working List
To rename an existing working list, follow these steps:
-
On the Accounts menu, click Accounts.
-
Apply the working list filter to the page you're viewing by selecting the working list and clicking Filter.
-
Click Edit.

-
Type the new name in the Edit Working List dialog box.
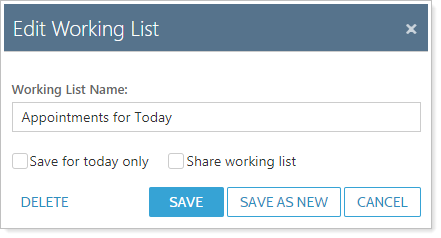
-
Click Save to overwrite the previous name or Save as New to create a separate working list with the same members.
Delete a Working List
You will not be able to edit or delete working lists others have shared with you.
To delete a working list you've created, follow these steps:
-
On the Accounts menu, click Accounts.
-
Apply the working list filter to the page you're viewing by selecting the working list and clicking Filter.
-
Click Edit.
-
Click Delete.