 Back
Back Home > Tamarac Reporting > Integrations > CRM Integrations > Salesforce Integration > Install and Configure Tamarac App > Set Up Custom Metadata
|
Back |
Home > Tamarac Reporting > Integrations > CRM Integrations > Salesforce Integration > Install and Configure Tamarac App > Set Up Custom Metadata
|
Set Up Custom Metadata
Single sign-on (SSO) allows you to open records in Tamarac Reporting directly from Salesforce. This powerful tool uses contextual links to take you to the exact Tamarac Reporting record relevant to you with a minimum amount of navigation on your part.

This page provides steps to set up custom metadata in Salesforce. Metadata is used for API authentication and single sign-on validation.
This is Step 3 in Workflow: Configure Single Sign-On in the Tamarac App. That workflow is the second step in the overall onboarding process.
To set up custom metadata:
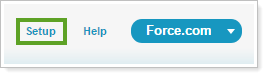
Click Setup.
In the search bar, search for Custom Metadata Types.
Click Custom Metadata Types in the search results.

Under All Custom Metadata Types, under Label, click Advisor View Setting.

Under Custom Metadata Type Detail, click Manage Advisor View Settings.

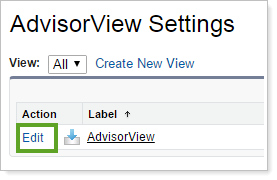
Under Advisor View Settings, click Edit.
Complete the following fields:
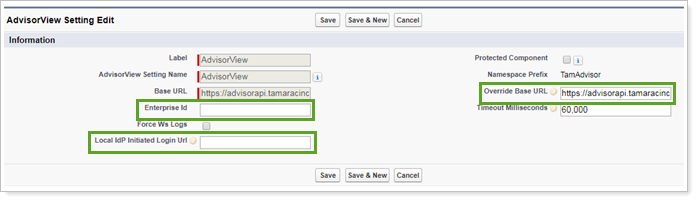
| Setting | What to Enter |
|---|---|
| Enterprise ID | This is your Tamarac Enterprise ID. Contact your Service Team if you need assistance finding your Enterprise ID. |
| Local IdP Initiated Login URL | Copy and paste the IdP-initiated Login URL from the Connected App. |
| Override Base URL | Copy base URL from the Base URL left and add /api. |
Click Save.