Contents
Rebalancing & Trading
Tax Loss Harvest Rebalance Now Results in Lot-Specific Trades And Tax Optimized Closing Method
We've updated the tax loss harvesting rebalance to make it more targeted in the lots it sells as part of the rebalance process, giving you a better and more precise tax loss harvesting option. Previously, the tax loss harvesting rebalance sold based upon the chosen closing method, whether that was FIFO, High Cost, etc. At times, this might not have created the most tax efficient selling of lots. For example, if the client's closing method was set to FIFO and the tax loss harvesting rebalance was used, the client's closing method might have prevented the most tax efficient rebalance.
To create the most tax efficient selling of lots, Advisor Rebalancing now automatically sets the closing method to Tax Optimization when you perform a Tax Loss Harvest rebalance, regardless of the default closing method set for the client. The Tax Optimization closing method sells lots in an order that maximizes the tax loss harvesting opportunity. See Closing Method for more information on the Tax Optimization closing method.
The tax loss harvesting rebalance will also ignore round lot settings, allowing you to focus on selling those lots that meet your tax loss harvesting threshold settings.
After completing a tax loss harvesting rebalance, you'll now see Sell Lots in the Action column of the Trade Summary. Those specific lots will then be communicated to the custodian, provided that this is supported by your trade file format.
Simplified Tactical Rebalance Settings
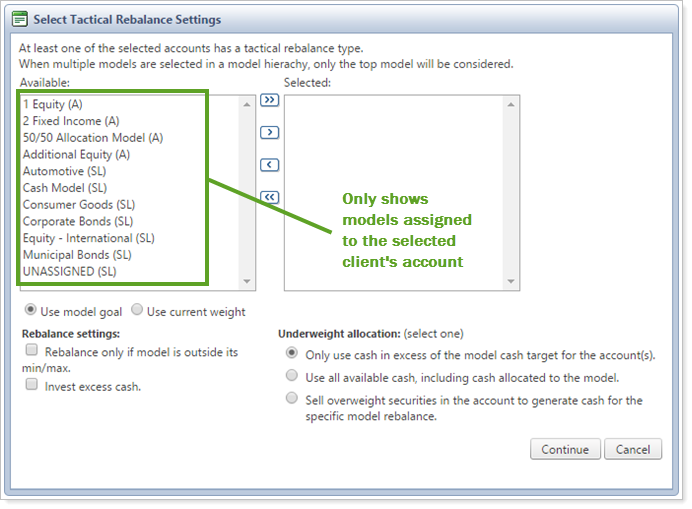
Previously, when selecting an account or group for a tactical rebalance, you'd see a list of all available models for any client account and this list could be quite long. Now we've made it faster and easier to find the models you need in a tactical rebalance.
Because you can select one or more accounts or rebalancing groups for a tactical rebalance, the Select Tactical Rebalance Settings window now only shows models in the selected account or accounts. Since you only see the relevant models within those accounts, it's faster to find the models you wish to rebalance.
Set default Original Cost per Share Setting on System Settings
Sometimes you don't have original cost per share information on securities. This makes seeing reports showing gains or losses problematic since you might not know how the original cost per share is being generated.
For securities for which you don't have cost basis information, you now have the option to change how you see the gains or losses on those securities by setting the default behavior for the original cost per share. You have two options for setting the default behavior for the original cost per share when there's no cost basis: you can set the share price to the current system price or you can set the cost basis to $.01—it's entirely up to you.
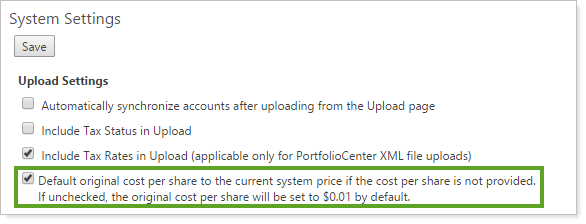
On the System Settings page, under Upload Settings, you'll now see the Default original cost per share to the current system price if the cost per share is not provided check box which controls this feature.
-
When selected, the default original cost per share on a security will be the current system price if you have not provided an original cost per share. If you choose this option, you won't see a gain/loss for the security because the cost basis will be set to the current system price.
-
When cleared, the original cost per share on a security will be $0.01 if you have not provided an original cost per share. If you choose this option, you will see a dramatic change in gains as the cost basis is set to a penny.
-
You can always override the default setting by editing the security on the Security Mapping page, found on the Upload menu.
User Management
Enhanced Page Permissions 
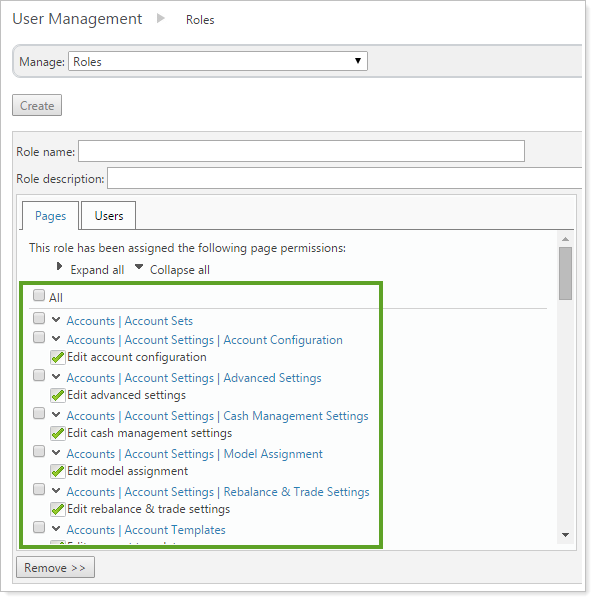
In May 2015, we introduced more robust model permissions to allow you greater control over who has access to specific pages and functions within Advisor Rebalancing. In our continued effort to give you even more control over user access, we're introducing new options within User Management. You can now limit access to most areas in Advisor Rebalancing, which gives you more freedom to completely limit access or grant view-only access to users.
Here are some of the benefits you'll see with this enhancement:
-
New permissions to restrict access to individual account, security, and system settings.
-
Upload permissions that are now restricted to areas that a user can edit.
Now, the options you see when you create a role or edit Pages within the Roles page mirror Advisor Rebalancing menus, helping you find the appropriate permissions.
Advisor OMS
New Manual Fills and Allocations for Advisor OMS 
While the Advisor OMS service gives you a powerful tool to trade directly with a broker within Advisor Rebalancing, we've heard your feedback that you'd like even greater control over this process.
That's why we've added manual fills and allocations to Advisor OMS, making it a more flexible tool for your trading needs. If you need to fill an order with a broker outside of the Advisor OMS system, or fill an order in the Advisor OMS system but complete allocations outside of the OMS system, you can resolve these issues directly in Advisor OMS manually.
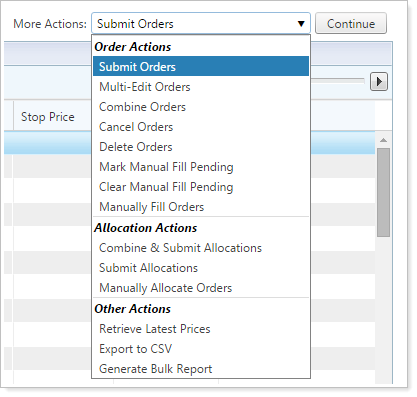
You can find the new manual processing options within a redesigned More Actions list. Here are the new options available:
-
Mark Manual Fill PendingMarking an order with this option indicates a pending manual fill order. This option prevents a pending order that is being filled outside Advisor OMS from being inadvertently submitted. In addition, the manual fill will remain on the page overnight with the same Manual Fill Pending status.
-
Clear Manual Fill PendingBy selecting this option, you change an order in Manual Fill Pending status back to New.
-
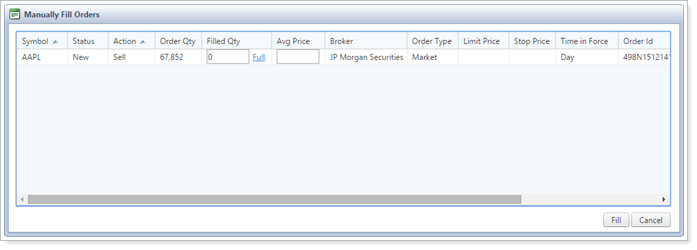
Manually Fill OrdersChoosing this option gives you the ability to mark orders as manually filled outside of Advisor OMS and enter that information into Advisor OMS using the Manually Fill Orders pop-up window. There, you can enter quantity information and average price. These orders can then later be allocated manually.
-
Manually Allocate OrdersThis option allows you to manually allocate orders in Advisor OMS and then generate a bulk report to send those allocations to the custodian. Partial fills can be allocated on either a random or pro-rata basis.
We've also reorganized the More Actions list into Order Actions, Allocation Actions, and Other Actions to help you quickly find the actions you need.
Reporting
New Submodel Tier Columns Now Available in Bulk Reports
We've heard your feedback that you'd like more detailed reports showing your models and their submodel tiers. We also know many of you would like these bulk reports to work with the pivot table feature in Excel.
That's why we're introducing a better way to report on your submodel tiers. We've added new Submodel Tier columns on the Account Security Information and Account Model Allocation bulk reports. These new columns allow you to see up to 20 submodels within the bulk report so you can see full reporting on your N-Tier models. You can also use these data to create pivot tables in Excel.
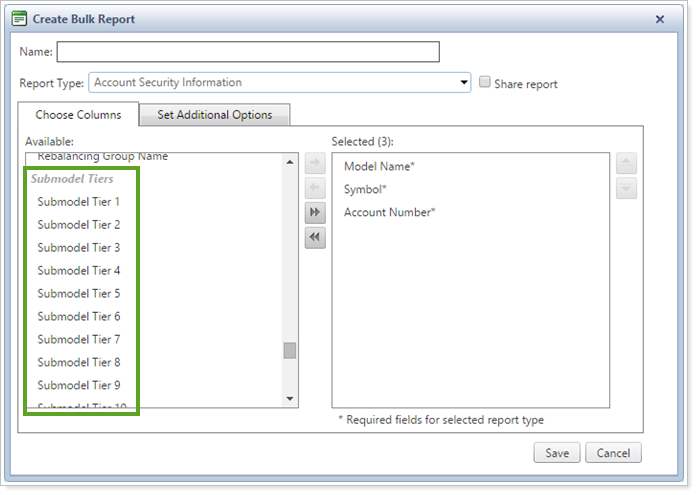
When viewing the bulk report, the Model Name column shows the Allocation model, while each of the Submodel Tier columns show allocation submodels. If there are no allocation submodels, these columns will be blank. You can then use this report to easily create a pivot table in Excel by grouping model tiers in order to replicate your model structure from Advisor Rebalancing.

Directed Trades
New and Updated Directed Trade Quantity Types to Trade to Targets and Adjusted Targets 
You now have additional options when you create directed trades that trade individual securities to model goals without completing a full rebalance. We've updated one existing directed trade quantity type and added another quantity type to give you more options to trade to model goals:
-
We've updated the behavior of the To Account Goal % quantity type so that this quantity type trades to a security's adjusted target within that client's account, as if completing a full rebalance, but without having to complete the full rebalance or a tactical rebalance on the security level model.
-
We've added the To Model Goal % quantity type which behaves the way the To Account Goal % quantity type used to behave by trading to a security's model goal.
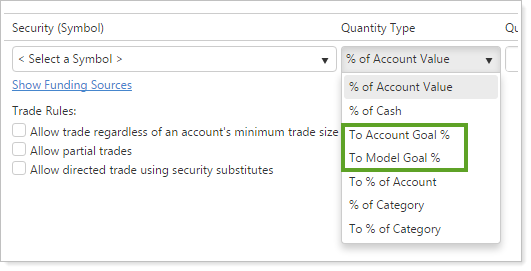
Here is a comparison of these quantity types:
| Quantity Type | Behavior | Example Scenario |
|---|---|---|
| To Account Goal % | Generates trade recommendation based on the security's adjusted model target, considering ranks, restrictions, and available cash, same as in a full rebalance. | ABC is overweight. ABC currently has a model goal of 12%. If you were to run a full rebalance on an account, the adjusted target for ABC would be 14% due to other restrictions in the account. By choosing To Account Goal % for the directed trade sell, Advisor Rebalancing will sell the security to the adjusted target of 14%. |
| To Model Goal % | Generates trade recommendation based on the security's model goal target. | ABC is overweight. ABC currently has a model target of 12%. By choosing To Model Goal % for the directed trade sell, Advisor Rebalancing will sell ABC to the model target of 12%. |
You can use the new To Model Goal % quantity type in instances where you would have used the old To Account Goal % quantity type to achieve the same behavior.
Integrations
Automatically Detect Account Type in Fidelity Trade Files
Fidelity Wealthscape has new features to automatically detect account types, even if they're not specified in the trade file. With this release, Advisor Rebalancing supports Fidelity's automatic account type detection. If you use Fidelity trade files, you no longer need to maintain account types in Advisor Rebalancing, which saves you time and might also prevent you from reporting an incorrect account type.
If you have Fidelity as your Equity Trade File Format, you'll see the option to select Auto in the Mark as Margin Account in Trade File for Equities/ETFs list. This feature must first be enabled by Fidelity; to use this feature, contact your Fidelity representative to ensure your firm has been enabled.
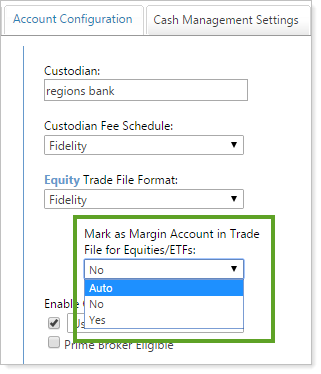
The Auto option leaves the Account Type field within the trade file blank, allowing Fidelity to automatically set the account type for you. You can select this option when editing the account settings for one or more accounts. It's also available on the Account Templates page.
VSP Now Available on Fidelity Trade Files for equities
We've added VSP trading for equities traded using Fidelity trade files. Previously, versus purchase trades were supported in Fidelity trading for mutual funds but not equities. You can now use Sell Lots trades for equities in Fidelity accounts, giving you more trading options if you use Fidelity trade files.
Important
Fidelity may process each lot as an individual trade. Please review trades in Wealthscape, and contact your Fidelity representative for more information.
Specify column Names and Bulk Report Types in Bulk Report API
Some of you have taken advantage of our Bulk Report API and have built your own application that allows your vendors, or others who don't have access to our Advisor Xi® suite, to:
-
Schedule reports to run on a daily basis
-
Export data to other systems
Previously, you were limited to bulk reports you had built in Advisor View or Advisor Rebalancing. However, with this release, the functionality of the Bulk Report API has been expanded. Along with running existing bulk reports, you can now also dynamically build reports, specifying column names and bulk report types. Please contact Account Management if you'd like to take advantage of this new feature.
To learn more, please search for Bulk Reporting API Master Article in the Support & Training Center.
Product Security
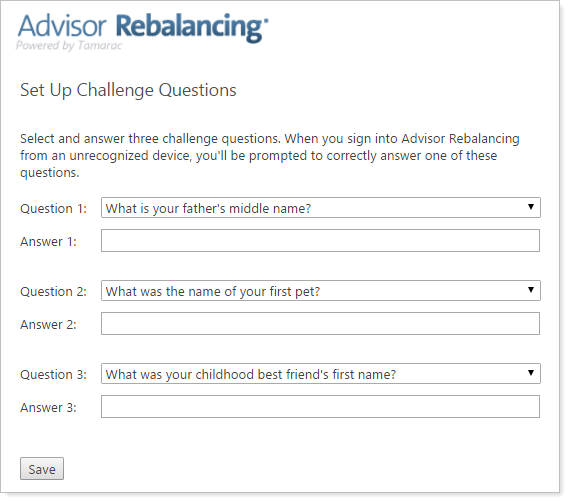
New Authentication Challenge Questions
We heard from a few of you that it wasn't always easy to remember the answers to our authentication questions. In order to make it simpler to sign in, we added some additional challenge questions:
-
What is your father's middle name?
-
What is the first name of your first boyfriend or girlfriend?
-
What is your spouse's middle name?
-
What was the name of your first pet?
-
What is your mother's middle name?
-
What was your childhood best friend's first name?
Usability
Asset Location Page Redesigned and Improved 
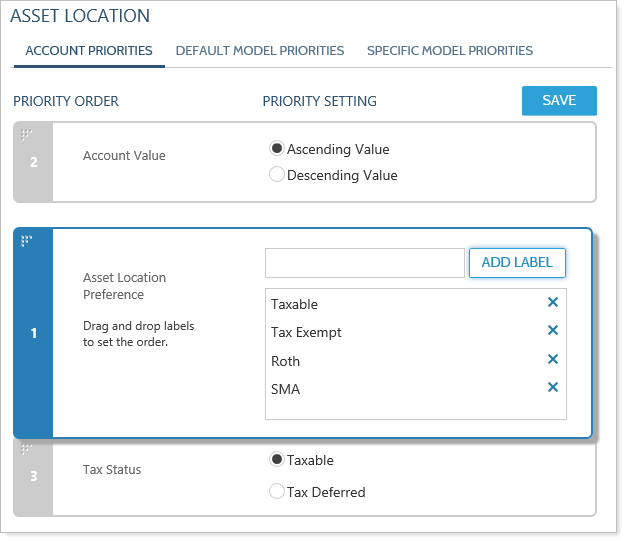
We're pleased to announce that we've updated the Asset Location page so you can now multi-edit several Asset Location Preference labels at once and visually drag-and-drop priorities into place. We've changed the pages so that you can now set default priorities and specific model priorities on separate pages. We've also updated all Asset Location pages to make them easier to read and edit.
Account Priorities
The following changes have been made to improve the Account Priorities page:
-
You can set the priority among three account settings: Tax Status, Account Value, and Asset Location Preference. To do this, use the drag-and-drop feature to set those settings into your desired priority.
-
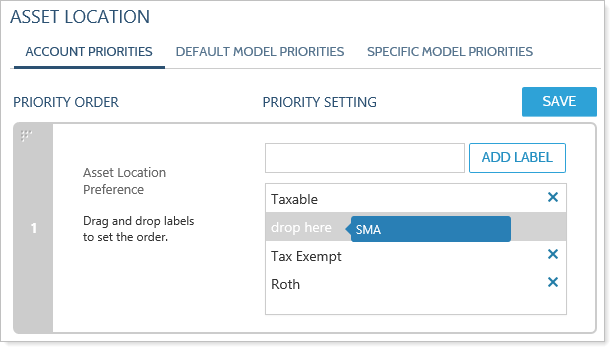
You can also use the same drag-and-drop feature to set the Asset Location Preference labels for your account types.
Default Model Priorities
The Default Model Priorities page allows you to set default priority preferences for one or more of the asset location preference labels you've created. You can simply drag and drop the models into your preferred order.
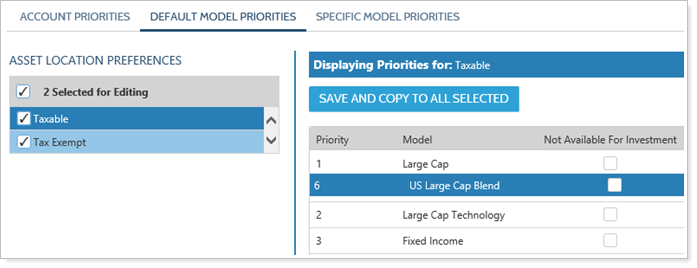
You can also set priorities for multiple asset location preference labels at once by selecting the check boxes next to each label. The primary asset location preference label shows in dark blue, while secondary labels show as light blue. A new Save and Copy to All Selected button allows you to save changes and apply them to all selected labels.
Specific Model Priorities
The Specific Model Priorities page makes it easy for you to create or edit specific model priorities.
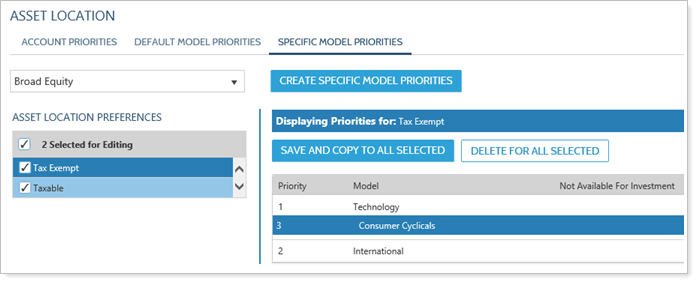
You can set priorities for multiple asset location preference labels at once by selecting the check box next to each label. The primary asset location preference label shows in dark blue, while secondary labels show as light blue. A Save and Copy to All Selected button allows you to save changes for multiple asset location preference labels while a Delete for All Selected allows you to delete priorities for multiple labels.
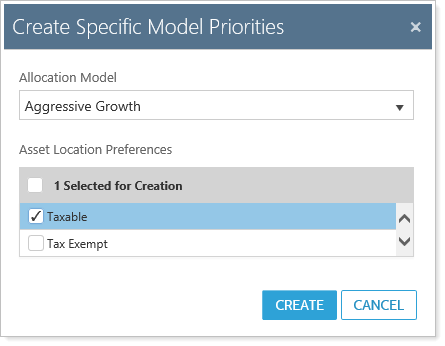
The page includes a new Create Specific Model Priority button which opens the Add Specific Model Priorities window. Here, you'll select an Allocation model from the list and then select the asset location preference labels to which you'd like to attach the specific priorities for this model.
New Advisor Rebalancing Data Dictionary 
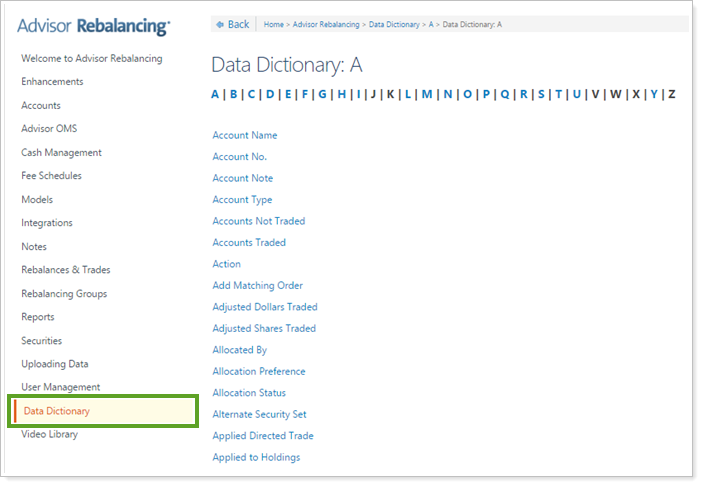
We're excited to now offer you an Advisor Rebalancing Data Dictionary within the Support & Training Center. We know that you might have questions about terms and features within Advisor Rebalancing and we want to provide you with answers.
The Data Dictionary is an alphabetical list of common terms you'll see throughout Advisor Rebalancing. You can find the Data Dictionary by accessing the link on the left-hand column of the Support & Training Center, or you can find definitions for terms by using search.
New Columns Available on Trade Review and Trade Summary Pages
You can further personalize your view of the Trade Summary and Trade Review pages—we've added more available columns to customize your at-a-glance view.
The following columns can be added to your view:
-
Percent of Account TradedThe Percent of Account Traded column shows the percentage of the account being traded on a security-level basis and shows you the overall impact of a particular trade on the account as a whole. Cash and cash substitutes are excluded from the calculation.
-
Realized Gain Percent and Unrealized Gain PercentThe Realized Gain Percent and Unrealized Gain Percent columns show a percentage of gain or loss of a security against the security's cost basis. Currently the realized and unrealized gains and losses are shown in dollars, depending on the trade action. However, these columns will allow you to see the realized and unrealized gains as a percentage of cost basis.
Note
The Realized Gain Percent column will show a value other than 0% only if the security has been sold previously.
-
Last Trade DateThe Last Trade Date column shows the most recent date of either the last open order or reconciled trade of that particular security within that account. This column gives you an overall picture for historical reference. If there hasn't been a historical record of a trade for that security, you'll see N/A in the Last Trade Date column.
-
Account TypeYou can now view this setting by adding the Account Type column to the Trade Review or Trade Summary pages. Account Type is set on the Account Configuration tab within Account Settings.
When viewing the Rebalance Summary for a rebalancing group, we've also added an Account Type column in the Underlying Accounts list. This allows you to see the same account type information.

-
Asset Location PreferenceYou can now view this setting by adding the Asset Location Preference column to the Trade Review or Trade Summary pages. Asset Location Preference is set on the Account Configuration tab within Account Settings.
Next and Previous Account on Trade Summary and Rebalance Summary Pages
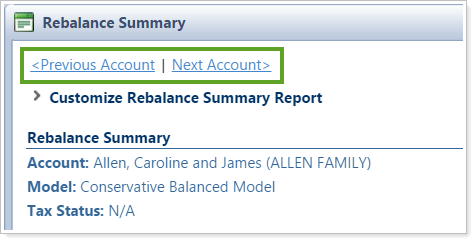
To improve your navigation experience, we've added Previous Account and Next Account links on the Trade Summary and Rebalance Summary pages, allowing you to navigate directly within those pages. Now you don't have to close out of one summary to view the next summary.
Custom Report Files is Moving Under a New Menu
We've moved the Custom Report Files page to a new, more intuitive location. The page is now located next to other pages and options that control client reports within Advisor Rebalancing. This structure allows you to access all of your client reporting options in one place.
Before, you could see Custom Report Files on the Upload menu. While this page allows you to upload your own files to create client reports, it makes more sense to put this upload option with other client reporting options. Now, you can find the Custom Report Files page under Client Reports on the Reports menu.

Learn More - Watch the Release Video
