Contents
Introduction
Custom fields in Tamarac Reporting allow you to capture details unique to your firm that the system does not include by default. For example, if your organization assigns internal account codes to distinguish management styles, you can create a custom field to track and report on these account codes in Tamarac Reporting.
By mapping the same client or account information from Tamarac Reporting to Tamarac CRM, you can better synchronize records across both systems, ensuring seamless tracking of custom data between Reporting and CRM.
This page provides steps for how to map and add custom fields to Tamarac CRM, deactivate and remove fields, and edit custom fields.
For details about this integration, see Custom Field Integration.
Before You Start
To map custom fields from Tamarac Reporting to Tamarac CRM, the following criteria must be met:
-
You must be a CRM Data Manager by having the assigned Security Role Tamarac Data Manager (Managed), or you must be a CRM System Administrator. To learn more, see Create Users in Dynamics 365.
-
Household and Financial Account Data Integration must be enabled in Tamarac CRM. Typically, this is done during the initial setup of your site. To learn more, see Enabling Tamarac Platform Integrations.
-
You must have custom fields created for Households, accounts, and groups in Tamarac Reporting. To learn more, see Custom Fields for Accounts, Groups, Households, and Securities.
The custom field mapping views will appear for a user under Field Mappings only when the criteria are met. The custom field mappings are separate from the existing managed field mappings that are created during firm onboarding.
Data Managers and System Administrators can access and maintain the custom field mappings, but only System Administrators can delete mappings.
Map and Add Custom Fields to Tamarac CRM
To map custom fields from Tamarac Reporting and see them in Tamarac CRM, complete the following steps:
-
In Tamarac CRM, map the custom fields.
-
In PowerApps, add the custom fields to the form and, if desired, update the display name.
-
In PowerApps, add the published form to the Tamarac CRM app.
Map New Custom Fields
Integrating custom fields from Tamarac Reporting into Tamarac CRM requires setting up field mappings to enable synchronization between the systems and adding the fields to custom forms to display appropriately in Tamarac CRM.
Each custom field must be mapped individually in Tamarac CRM to initiate the sync before customizing the data on custom forms in PowerApps.
To set up a new custom field mapping:
-
In Tamarac CRM, under Setup, select Field Mappings.
-
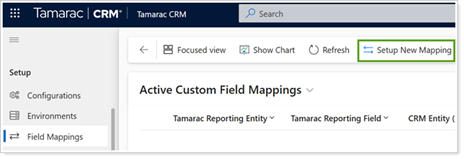
Under Active Custom Field Mappings, select Setup New Mapping.
-
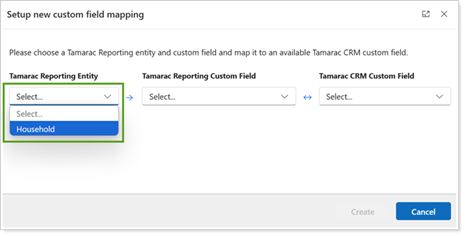
In Tamarac Reporting Entity, select the record type you want to sync.
-
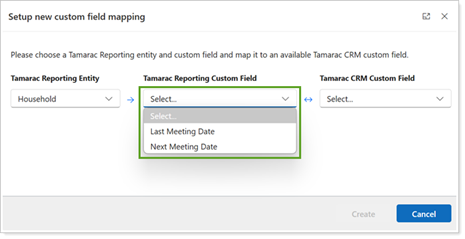
In Tamarac Reporting Custom Field, select the name of the custom field from Tamarac Reporting.
-
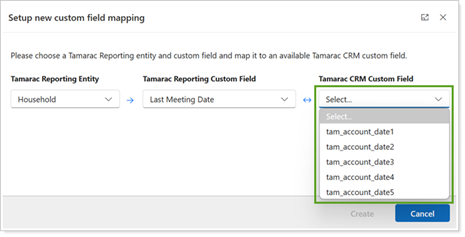
In Tamarac CRM Custom Field, select the corresponding custom field you want to map in CRM.
-
Select Create.
-
Once your new mapping has been created, select Map Another to restart the process or Close to finish.
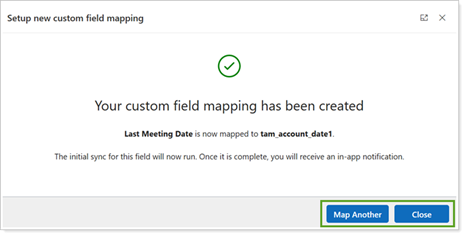
Refresh the page to see all newly created mappings in the Active Custom Field Mappings view.

Once the initial sync of the custom field mapping is complete, you should see a Custom Field Mapping Sync Success In-App notification. Following this confirmation, you may edit the Display name and add the field to your custom form.
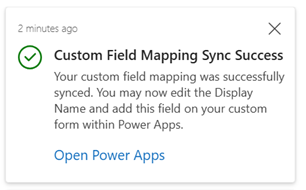
If you receive a sync failure notification, try to reactive the mapping. If that second sync also fails, reach out to your CRM Support team.
Add Custom Fields to Forms in PowerApps
Once all new mappings have been created and synced, you add the custom fields to the forms.
-
Open PowerApps (external link opens in a new tab). Ensure that the Environment is set to your production site. This should be the environment without the word Default after it.

-
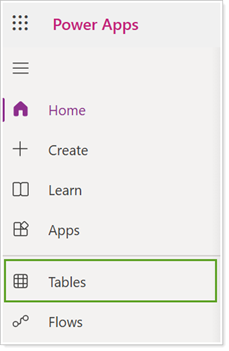
In the navigation pane, select Tables.
-
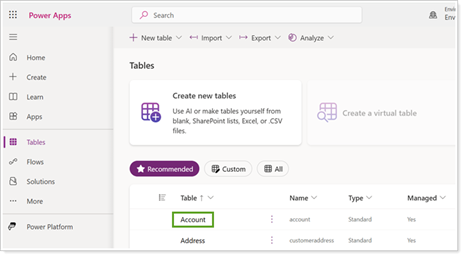
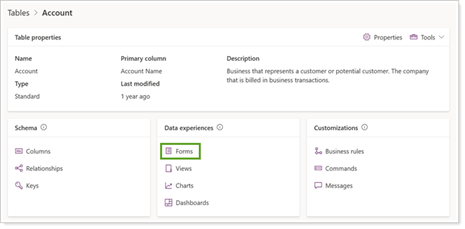
Depending on the form you want to update, from the Tables list, select Account or Financial Account. Note that both mapped Account and Group custom fields from Tamarac Reporting should be added to the Financial Account form.
-
Under Data Experiences, select Forms.
-
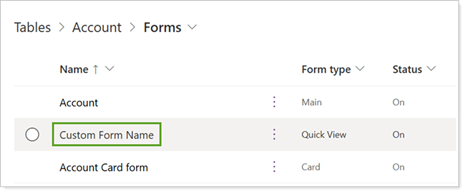
Select your custom form name in the list to open it.
Note
To ensure that your custom fields aren’t impacted from system updates in the future, do not add custom fields to Managed Main type forms. Only add custom fields to your custom forms.

If you need assistance in creating a custom form, reach out to your CRM Support team.
-
From Table Columns, drag and drop the field you created onto the form where you would like it to appear.
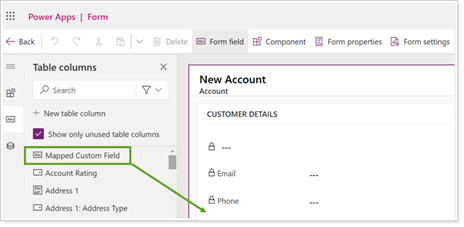
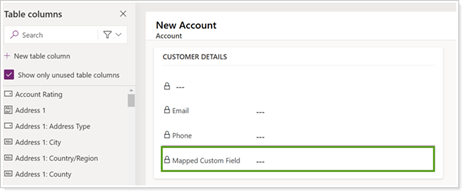
The field is added to the form.
-
In the field, under Properties expand Display options.
-
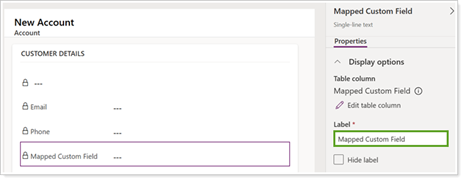
Select Label and update the name of the field to match the custom field in Reporting.
-
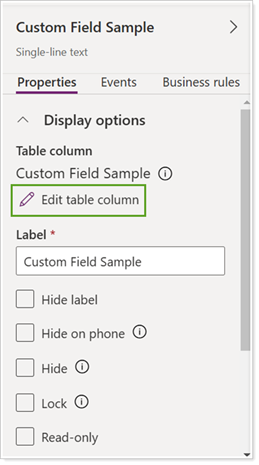
Select Edit table column to update the Display Name for the custom field. This controls what field name will appear in CRM views.
-
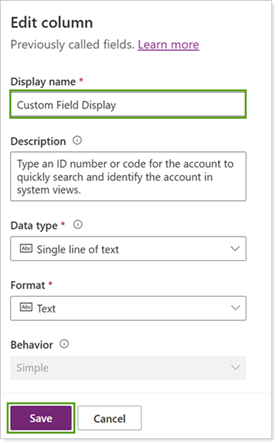
Type your new Display name and select Save.
-
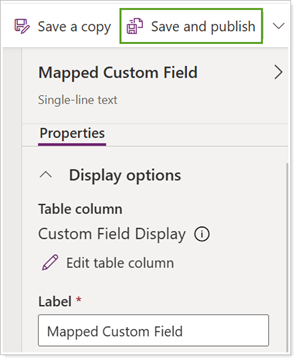
Repeat for as many custom fields as you need to add to Tamarac CRM forms. When complete, select Save and publish.
Add Custom Forms to Tamarac CRM in PowerApps
To add the custom forms to the Tamarac CRM app:
-
In PowerApps, under Apps, select Tamarac CRM.

-
In Pages, select the appropriate form you need to add to Tamarac CRM.

-
Under Not in this app, select your custom form.

-
Select Add.

Once added, the form will appear under In this app.
-
Select Save and Publish.

The custom form will now appear in Tamarac CRM.
If the custom form is not the default view in Tamarac CRM, you will need to switch the view inside the record. The new form will be displayed moving forward unless you change it.

Alternatively, you can disable the main managed form in Power Apps and the new custom form should be used as the default for all users once published to the Tamarac CRM app.
Deactivate Custom Fields
Occasionally, certain custom fields may no longer be relevant to your organization. You can prevent the custom field data mapping over to Tamarac CRM altogether with the following tools:
-
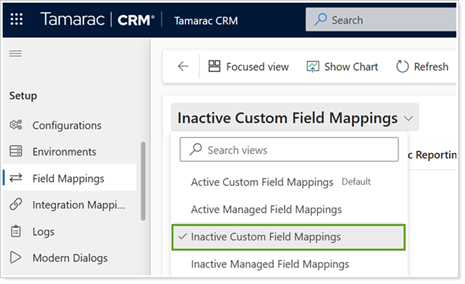
Deactivate Mapping. Deactivation moves the custom field mapping to the Inactive Custom Field Mappings view. This will enable future review and re-activation of the custom field mapping if deemed necessary.
-
Delete Mapping. Deleting removes the custom field mapping from the platform altogether. Since it cannot be retrieved or re-activated in the future, it is not recommended as a best practice. Only System Administrators can delete custom field mappings.
To deactivate or delete custom fields from Tamarac Reporting and remove them from Tamarac CRM, complete the following steps:
-
In Tamarac CRM, deactivate the custom fields.
-
In PowerApps, remove the custom fields to the form.
Deactivate a Custom Field Mapping
To deactivate a custom field in Tamarac CRM:
-
In Tamarac CRM, under Setup, select Field Mappings.
-
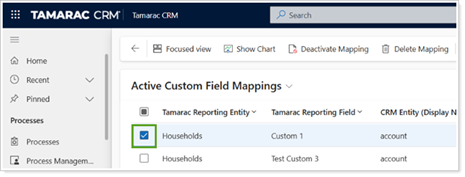
Under Active Custom Field Mappings, select the custom field mapping you would like to deactivate or delete.
-
Select Deactivate Mapping or Delete Mapping.

-
A confirmation window will appear for either option. Select Deactivate or Delete, as applicable.
If you deactivate a custom field mapping, the mapping will still appear under the Inactive Custom Field Mappings view. Y ou can reactivate it from there, if needed.
Remove Custom Fields from the Form
To remove the custom field from any custom forms they were added to:
-
Open PowerApps (external link opens in a new tab). Ensure that the Environment is set to your production site. This should be the environment without the word Default after it.

-
In the navigation pane, select Tables.

-
From the Tables list, select Account.

-
Under Data Experiences, select Forms.

-
Select your custom form name in the list to open it.

-
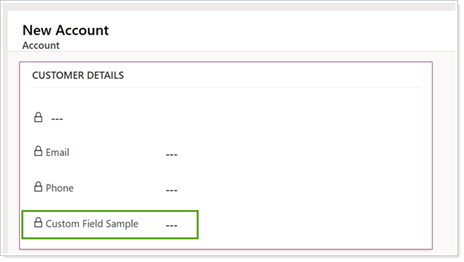
Locate the field on the form and select it.
-
To remove the field from the form, select Delete.

-
Reorder any fields as needed on the form to remove extra spacing, then select Save and publish.

To see the changes in Tamarac CRM, refresh the page. You may need to press CTRL+F5 to see the page to force a refresh.
Reactivate a Custom Field Mapping
Occasionally, you may need to restore custom field mappings that have been deactivated for your organization. You can Activate Mapping of a deactivated custom field to re-enable the data mapping.
To reactivate a custom field mapping:
-
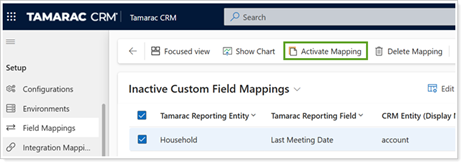
In Tamarac CRM, from the Field Mappings list, select Inactive Custom Field Mappings.

-
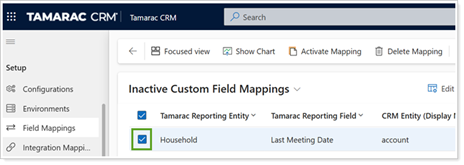
Select the custom field mapping that you would like to restore.
-
Select Activate Mapping.
-
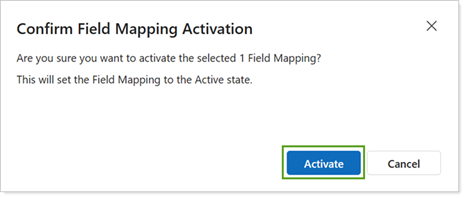
Select Activate.
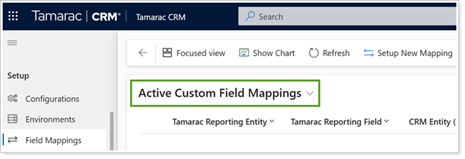
If the mapping successfully reactivated, it will appear under the Active Custom Field Mappings view and the initial sync will run.
Resolve Business Process Error Caused by In-Use Mappings
To successfully reactivate, the system validates that the custom fields included in the Inactive Custom Field Mapping are not already in use by Active Custom Field Mappings. If they are in use, reactivation will fail, and you will see a Business Process Error.

Edit a Custom Field Mapping
The most efficient way to make changes to an existing custom field mapping is to first Deactivate Mapping or Delete Mapping and restart the steps to Setup New Mapping.
If you are replacing or reusing an existing mapping for a new field, data currently stored in the field will be overwritten once the new mapping is created.
