
Contents
Introduction
With billing reconciliation, you can manually and automatically reconcile payments for your services, which helps you account for every billing statement and payment in your firm.
You can mark payments as unpaid, paid, and partially paid and run reconciliation reports to track your outstanding fees.
Auto-Reconciliation
Tamarac Reporting can automatically reconcile payments for billing statements. When you perform auto-reconciliation, Tamarac Reporting looks through your management expense transactions for a matching dollar amount within the time period you specify.
For example, you need to reconcile a payment of $40.45 in account 1234-5678 90 days after the billing date. Tamarac Reporting searches for management expense transactions of $40.45 in account 1234-5678 90 days after the billing date. When a matching transaction is found, Tamarac Reporting marks the billing statement as paid.
To perform auto-reconciliation, follow these steps:
-
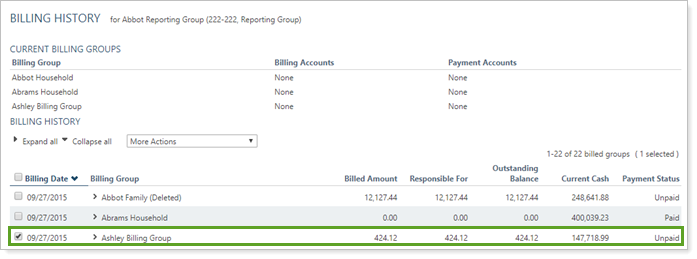
On the Billing menu, click Billing History.
-
In the Find Data For list, click All Accounts.
-
Click Edit. In the Date Range list, click the date period for the quarter that you billed for. When finished, click Apply.
-
Select the check boxes next to the billing statements that you want Tamarac Reporting to automatically reconcile as paid, or select all billing groups using the check box next to the Billing Date column.
-
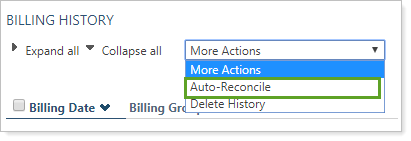
In the More Actions list, click Auto-Reconcile.
-
Choose the number of days to search for the past billing data. For more information, see Search Past X Days Past Billing Date.

-
Select the Remove all associated reconciliations check box, if applicable.
-
Click Start Auto-Reconcile.
-
When the auto-reconciliation is complete, Tamarac Reporting will take you to the Auto-Reconciliation History page where you can see the results of the auto-reconciliation.
Auto-Reconciliation History
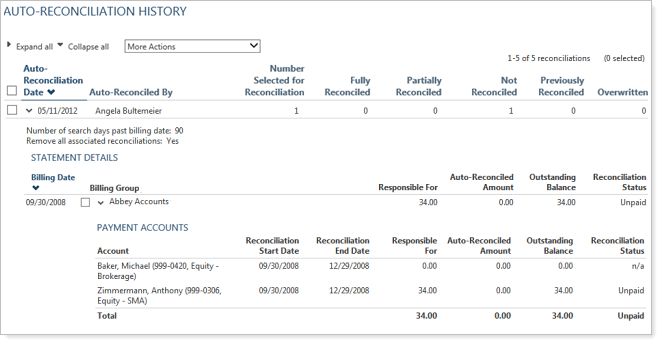
After you run auto-reconciliation, view the Auto-Reconciliation History report and review any reconciliation errors that need to be corrected. This report is generated automatically after you run auto-reconciliation or you can run it whenever needed. To run the report manually, on the Billing menu, click Auto-Reconciliation History.
The Auto-Reconciliation History report shows the number of accounts that you selected for auto-reconciliation and the number of accounts that were fully, partially and previously reconciled.
The following columns appear on the report:
| Field | More Information |
|---|---|
| Number Selected for Reconciliation | The number of statements Tamarac Reporting attempted to auto-reconcile. |
| Fully Reconciled |
The number of billing statements where payment amounts were found and associated automatically to fully fulfill the amount all payment accounts were responsible for. |
| Partially Reconciled | The number of billing statements where a matching payment amount was found for at least one payment account in a billing group but not all payment accounts in all billing groups. |
| Not Reconciled | The number of billing statements where no matching management fee could be found for any payment account in any billing group. |
| Previously Reconciled | The number of statements skipped because the statement was previously reconciled. |
| Overwritten | The number of statements originally selected for auto-reconciliation that are no longer available because the associated billing history or the historical auto-reconciliation entry was deleted after the auto-reconciliation was run. |
| Responsible For | The amount the billing group is responsible for paying. |
| Auto-Reconciled Amount |
The amount automatically reconciled. N/A will appear in this field if this account is not included in the current auto-reconciliation—for example, if the account was reconciled in a previous attempt. |
| Outstanding Balance | This is the amount that has not yet been paid for the selected account or billing group. For accounts with a reconciliation status of Paid, $0.00 will appear in this field. |
| Reconciliation Status | The status of the auto-reconciliation. |
| Reconciliation Start Date | The first date that the auto-reconciliation searched for matching management expense transactions. |
| Reconciliation End Date | The last date that the auto-reconciliation searched for matching management expense transactions. The number of days to look for matching management expense transactions is specified when initiating the auto-reconciliation on the Billing History page. For more information, visit Billing History Report. |
If you want to delete the auto-reconciliation history, select the check box next to the item you want to delete, and then click Delete in the More Actions list.
To export the auto-reconciliation history, select the check box next to one or more items you want to export, and then click Export Data in the More Actions list.
To find the payment details for a particular billing group, click View Payment Details.
Manually Reconcile a Billing Statement
In some cases, you may need to manually reconcile a billing statement—for example, if the client pays with a check or if the client only pays part of a bill.
To manually mark a billing statement as paid, partially paid, or unpaid, follow these steps:
-
On the Billing menu, click Payment Details.
-
In View, choose the paid status of the billing group you want to review. For more information, see View Payment Status For Date Period.
-
In date period, choose the date period you want to manually reconcile. All your firm's date periods are available.
-
In Billing Groups, type in two or more letters. Click the appropriate billing group name when it appears.

-
In Select billing date, choose the applicable billing date.
-
Click Edit next to the billing statement you want to edit.

-
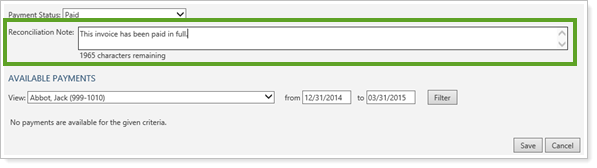
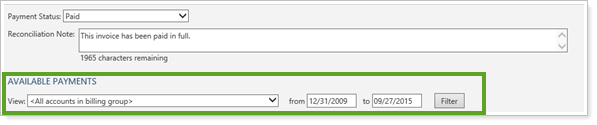
In Payment status, choose the payment status of the billing statement.
-
In Reconciliation note, type a note for the reconciliation. This note appears on the Auto-Reconciliation page and helps you identify billing groups that have been manually reconciled, and what was done during that reconciliation.
-
In some cases, auto-reconciliation may not correctly identify and match a payment. If you want to manually search for a payment, follow these steps:
-
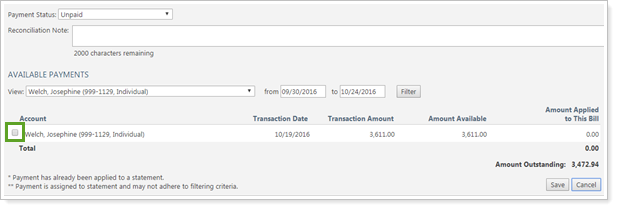
Under Available Payments, in the View list, choose the account that made the payment. If you want to search for all accounts, click All accounts in billing group.
-
In the From and To boxes, specify the date range that you want Tamarac Reporting to search for management expense transactions. This searches for all the transactions in the selected account that are marked as management expenses, and therefore could be applied to an outstanding bill.
-
Click Filter. A list of transactions in that account within that date range appears.
-
Select a check box next to one or more transactions that you want to apply to the bill. Click Save.
-
-
Click Save.