
Contents
|
Map Default Financial Accounts/Accounts in Sales Cloud Map to a Custom Financial Account Object Create Fields for Manual Mapping |
Introduction
Mapping links a field in Tamarac Reporting with the same field in Salesforce. It allows you to use your existing customized Salesforce objects to view Tamarac data by telling the two systems where each piece of data belongs.
For more information about mapping, see Understanding Mapping in the Salesforce Integration.

This page provides steps to map Salesforce Financial Accounts with Tamarac accounts.
This is Step 4 in Workflow: Configure Mapping. That workflow is the third step in the overall onboarding process.
Map Default Financial Accounts/Accounts in Sales Cloud
To map Salesforce Sales Cloud Financial Accounts with Tamarac accounts:
-
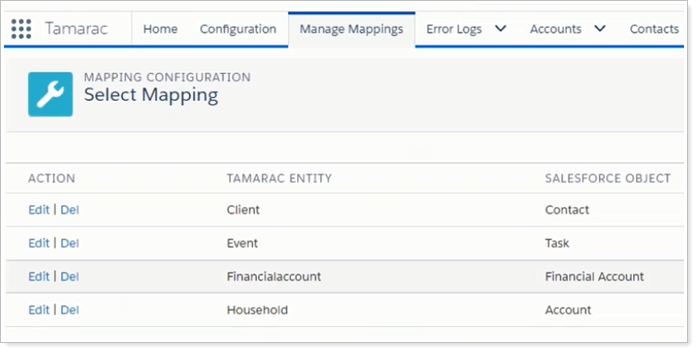
Open the Tamarac app in Salesforce.
-
Under Manage Mappings, click Edit in the Client/Contact row.
-
Shared fields between Tamarac Reporting and your version of Salesforce will be mapped by default in the Tamarac app.
For a list of all the Contact fields automatically mapped, see Default Financial Account/Account Mapping.
-
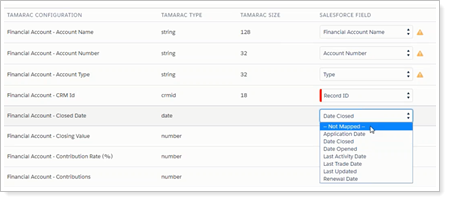
For each Tamarac Reporting configuration field where Not Mapped is selected in the Salesforce field list, click the Salesforce field list and select the Salesforce field that corresponds to the Tamarac Reporting field.
-
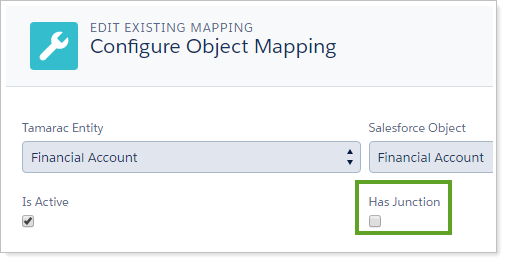
Select Has Junction if the object contains records that are associated with multiple other records. For example, if the same financial account is assigned to multiple Accounts, select Has Junction.
-
When you are done, click Save.
-
When you have reviewed the mapping for all the objects, click Send Mappings to send mappings to Tamarac. Click Send Mappings even if you don't make any changes to the default mappings. This creates the mapping link between Tamarac and Salesforce.

Map to a Custom Financial Account Object
If you already have a custom Financial Accounts object in Salesforce, you can manually map Tamarac Reporting fields to your custom object fields. You will choose to do this if you are an experienced Salesforce user and you want to display Tamarac Reporting data in your unique custom Financial Account object fields.
Mapping to a custom Financial Account Object involves two steps:
- Create fields for manual mapping.
- Manually map to the fields you created.
You'll find instructions for both steps below.
Create Fields for Manual Mapping
To manually create required fields:
-
Under Setup, search for Object Manager.
-
On the Object Manager page, search for Financial Account.
-
Select your custom Financial Account.
Note
For Financial Services Cloud, select the Financial Account with the API Name FinServ__FinancialAccount__c
-
Click Fields & Relationships.
-
Click New.
-
To create the Tamarac ID field, choose Text. Fill in the following:
Characteristic Value Field Label Tamarac ID Length 20 External ID Checked To create the Updated by Tamarac Integration field, choose Checkbox. Fill in the following:
Characteristic Value Field Label Updated by Tamarac Integration -
Click Next.
-
Select Establish Field-Level Security Requirements.
-
Click Next.
-
Select Page Layouts.
-
For each Tamarac required field, select the corresponding Salesforce field you just created.
-
Click Save.
Manually Map to a Custom Financial Account Object
To manually map Tamarac object fields to your existing Financial Account object fields:
-
Create new fields in your existing Financial Account object to match required Tamarac fields.
For more information on what fields are available for integration, see Default Financial Account/Account Mapping.
-
In Manage Mapping, click Delete next to Financial Account. When you delete the default mapping and a create a new one, the fields will all default to not mapped. All fields will need to be mapped individually by the Salesforce Admin.
-
Click New Mapping.
-
Set the Tamarac entity to Financial Account.
-
Set the Salesforce object to Financial Account.
-
Map the required fields.
The following fields must be created and mapped:
Tamarac Reporting Field Salesforce Field Action Financial Account – Tamarac ID Tamarac ID Track the ID of the record from Tamarac.
This field is not mapped by default in a custom financial account object. It must be manually mapped in order for the financial account integration to be enabled.
Financial Account – Updated by Tamarac Integration Updated by Tamarac Integration Track when an update to the financial account in Salesforce is made through integration with Tamarac.
This field is not mapped by default in a custom financial account object. It must be manually mapped in order for the financial account integration to be enabled.
-
Click Save.
-
When all mappings are complete, click Send Mappings.
Manually Map to a Financial Services Cloud Financial Object
To manually map Tamarac object fields to your existing Financial Account object fields:
-
Create new fields in the Financial Services Cloud object to match required Tamarac fields.
-
Click New Mapping.
-
Set the Tamarac entity to Financial Account.
-
Set the Salesforce object to Financial Account.
-
Map required and desired fields. For more information on what fields are available for integration, see Default Financial Account/Account Mapping.
The following fields must be created and mapped:
Tamarac Reporting Field Salesforce Field Action Financial Account – Tamarac ID Tamarac ID Track the ID of the record from Tamarac.
This field is not mapped by default in a custom financial account object. It must be manually mapped in order for the financial account integration to be enabled.
Financial Account – Updated by Tamarac Integration Updated by Tamarac Integration Track when an update to the financial account in Salesforce is made through integration with Tamarac.
This field is not mapped by default in a custom financial account object. It must be manually mapped in order for the financial account integration to be enabled.
Primary Owner Not Mapped A default primary owner is required in order to save mapping.
For Financial Services Cloud, a primary owner is required for Financial Account data to sync.
For details, see Assign Default Primary Owner for Financial Accounts in Salesforce: Create New Clients, Households, and Financial Accounts.
-
Click Save.
-
When all mappings are complete, click Send Mappings.