
Contents
|
Two Options for Tracking Historic Performance Data in Sleeves Gather Historic Performance Data |
Introduction
If your firm uses sleeves to track sleeve performance in Tamarac, tracking ongoing performance after you create those sleeves is simple: Once you’ve enabled the accounts and models you’ll use as the basis of your sleeve accounts, you can generate a trade and, after a sync, Tamarac automatically generates your sleeve accounts and manages allocations to those sleeves, no further sorting or tracking required.
However, if you have existing accounts and you want to use Tamarac's sleeve-level reporting to track historic performance data, you can use an upload to add those historic sleeve allocations, allowing you to view performance data for your sleeves in various reports in Tamarac. If you create sleeve accounts and don’t upload any historical transactions data, the allocations in those accounts going forward are based on trades and orders completed in Tamarac.
This topic covers steps and important considerations when you upload historic data for your sleeve accounts.
Two Options for Tracking Historic Performance Data in Sleeves
You have two options for adding historic performance data to your sleeve accounts:
- Tamarac Uploads Interval Performance Data.With this method, Tamarac uploads historic data for you. Once complete, you’ll see more granular performance details. However, you cannot upload this information yourself. To use this option, contact Tamarac support as this must be done by Tamarac. Learn more >>
-
Use the Sleeve Report Allocations upload data set.With this method, you can prepare and upload historic data for your sleeves yourself. Once complete, you can see historic performance data for your sleeves. This option is covered in the steps below.
Before You Upload Data
Before you upload historic data for your sleeve accounts, you'll need the following information.
Create Sleeve Accounts
Complete the following steps to create your sleeve-level accounts.
- Prepare and enable models.Models are the basis for sleeve accounts, so even when you are uploading historic data, you must still set up and assign the correct models to your accounts. For more information, see Enable Sleeve-Level Reporting in a Security Level Model.
- Enable Accounts and Assign Models.Assign the proper models to your accounts in which you'll use sleeve-level reporting and ensure those accounts are enabled for sleeve-level reporting. For more information, see Enable Sleeve-Level Reporting in an Account.
- Sync.Run a sync to ensure model data flows from Tamarac Trading to Tamarac Reporting to establish allocations in sleeve-level accounts. For more information, see Synchronize Data From Portfolio Accounting System.
Find Upload Sleeve ID
Upload Sleeve ID is a data point that matches specific security allocations to specific models. This establishes historic allocations, allowing you to view performance data from the past.
To find Upload Sleeve ID, use a bulk report:
-
On the Reports menu, under Global Reports, click Bulk Reports.
-
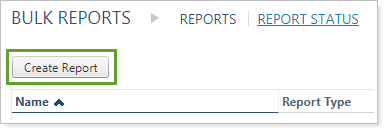
Click Create Report.
-
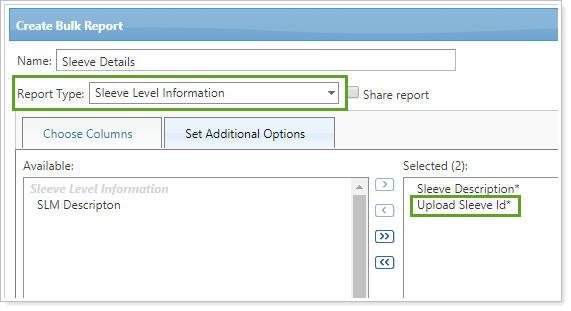
Type the name of the report in the Name box. Give the report a name that makes sense for your firm.
-
In Report Type, choose Sleeve Level Information. Upload Sleeve Id will be selected by default.
-
Click Save.
-
On the Bulk Reports page, click Run Report.

-
Once the report has been generated, download the report on the Bulk Report Status page by clicking Download Report. Save the report locally.

Use the CSV report you downloaded to find Upload Sleeve ID for your corresponding models.
The Untracked sleeve account will always have the Upload Sleeve ID of 0. Any unallocated securities will automatically be held in the Untracked sleeve account.
Gather Historic Performance Data
Once you have your Upload Sleeve ID data point, you can use that data point to match securities with their models. This sets the historic allocations within your sleeves, allowing you to track performance data.
Use Data Specifications for guidance on data points and formatting.

Upload Historic Sleeve Allocations
The process described below will track allocations data from the stated Allocation Date forward. For example, if you upload allocations using the Allocation Date 1/15/2016, you will be able to view historic performance data for your sleeves from January 15, 2016 to today.
However, if your allocations changed during that time period, you will need to upload additional data. For more information, see Allocation Changes and Overlapping Securities.
important
- Uploading the Sleeve Account Allocations data set will overwrite, not add to, any existing allocations for the sleeve accounts on the specified allocation date.
- When uploading historic sleeve allocations, include all securities in the account in your upload. Otherwise, the system may assume securities go into the Untracked sleeve.
Once you've prepared your data and you're ready to upload historic sleeve allocations data, follow these steps:
-
On the Setup menu, click Upload.
-
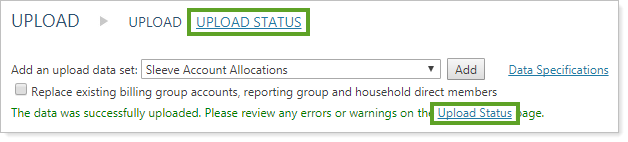
In Add an upload data set, select Sleeve Account Allocations.

-
Click Add.
-
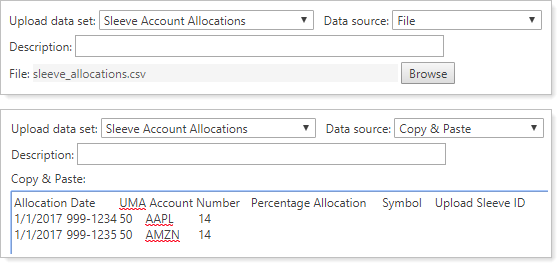
In the Data source list, choose whether you want to upload a file by selecting File or directly paste the data by selecting Copy & Paste.
-
Add an optional Description to describe the upload, if needed. This lets you differentiate and describe different uploads on the Upload Status page.
-
Using your prepared data, Browse for your data file or paste the data into the Copy & Paste area.
In the Sleeve Account Allocations upload data set, UMA Account Number is the account number of the parent account that holds the sleeves, not the individual sleeves' account numbers.
-
Click Upload.
-
Click the Upload Status link to go to the Upload Status page. This page allows you to verify if upload was completed successfully and to check for possible errors or warnings.
Historic data will appear after the next sync.
Allocation Changes and Overlapping Securities
If you have historic performance data but no allocation changes within sleeves of a parent account, you would only need to upload the Sleeve Account Allocations upload data set once to see historic data. In this scenario, once you've uploaded your allocations, Tamarac will track sleeve data going forward from the date you specified.
However, if those allocations or models change, you will need to upload additional data for each date the allocations changed to reset those allocations. For example, if data for an account begins on January 15, 2016 and allocations changed in that account on July 15, 2017 and December 1, 2017, you would need to upload complete allocations for 1/15/2016, 7/15/2017, and 12/1/2017.
If you have overlapping securities where a single security is held in more than one sleeve, specify the correct allocations to each sleeve in your upload. Without uploaded allocations data, overlapping securities will be allocated based on the prorated weight of those securities in their respective models, which may not accurately reflect your allocations.