
Contents
|
Introduction to PortfolioCenter Sync Capture Changes Since the Last Sync |
Introduction to PortfolioCenter Sync
Tamarac relies on Portfolio Accounting Systems (PAS) like PortfolioCenter to provide underlying data such as account details, security details, transactions, and prices. You must sync Tamarac to update data that has changed in your PAS. During the sync, Tamarac imports data for the date range specified.
Syncs occur in the following situations:
-
Daily Morning Sync. For firms using Advisor Services, Tamarac teams sync your Tamarac data with PortfolioCenter every morning. You don't have to do anything; this sync occurs early each morning to ensure that your firm has the latest account values, performance numbers, holdings, and transactions every day.
-
When Portfolio accounting system data Change. Sometimes you need to adjust PortfolioCenter to reflect a price change or a transaction that happened in the past. This type of data correction occurs occasionally, and you must sync before you see any PortfolioCenter corrections in Tamarac.
When you want to run a sync during the day, you can choose to run the sync yourself or to ask the Tamarac Support team to run a sync for you. If the Support team is helping you correct PortfolioCenter data, likely they'll run the sync for you.
Important
Clients and firm users will not be able to access Tamarac during a sync.
Choose the Sync Length
When running a sync, you must decide how far back you want the sync to go. To make this decision, remember that the farther back a sync goes, the longer it takes. Because you can't access the site during a sync, you'll probably want to go back the shortest amount of time possible. Although you can sync back to inception, you'd only choose to do so under very rare circumstances.
As a best practice, run a sync only as far back as you need to capture the change that will impact returns or holdings within the period. For example, if you updated a transaction, price, or manual security snapshot from six months ago, run a six-month sync to see those changes.
An inception to date sync recalculates all your values through your entire history. Use it any time you enable a feature that fundamentally changes how Tamarac calculates holdings or cost basis or when you make a change that impacts historical values across all accounts. For example, an inception to date sync is appropriate in the following circumstances:
-
To capture changes that occurred a long time ago if you aren't sure of the exact timing.
-
You turned amortization on or off.
-
You changed all your security categories.
-
You enabled or disabled accrued dividends.
Run a Sync
To synchronize data manually, follow these steps:
-
On the Setup menu, click Sync From Portfolio Accounting System.
-
Complete the desired sync settings:
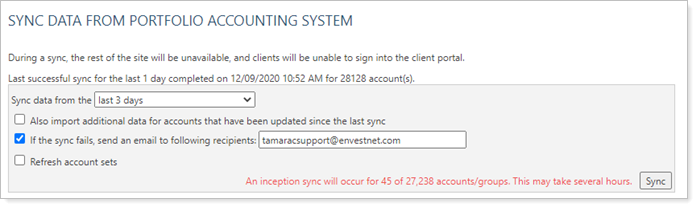
- Sync Data From The: Set how far back the sync goes.
- Also Import Additional Data For Accounts That Have Been Updated Since The Last Sync: Capture changes since the last sync, regardless of the sync length.
- If The Sync Fails, Send An Email To The Following Recipients: Set who to notify if an issue occurs during the sync.
- Refresh Account Sets: Update Account Set membership during the sync.
-
Click Sync.
Capture Changes Since the Last Sync
You can configure Tamarac Reporting to identify any accounts or transactions have been updated in your Portfolio Accounting System before the last sync date. If so, Tamarac adjusts the sync start date accordingly.
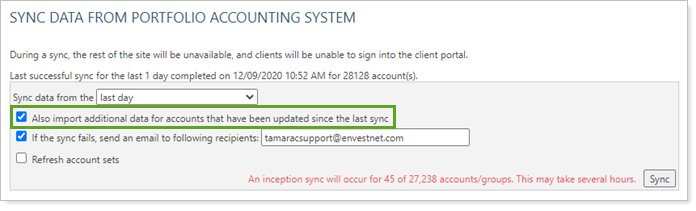
For more information, see Also Import Additional Data For Accounts That Have Been Updated Since The Last Sync.
Sync Performance for Groups
You control whether or not Tamarac Reporting calculates performance for groups during the sync.
When you calculate performance, Tamarac Reporting will not prevent you or your clients from signing into the program. However, if you sign in during the sync process, Tamarac Reporting will show you performance as of the previous market close.
To change this setting for a group:
-
On the Accounts menu, click Accounts.
-
Click the group you want to edit.
-
On the Reporting tab, click Settings/Templates.
-
Select or clear Calculate performance during sync as desired.
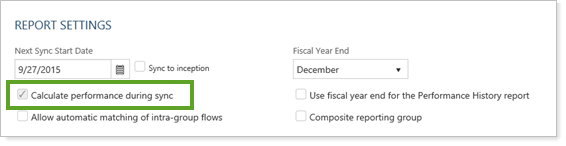
-
Click Save.
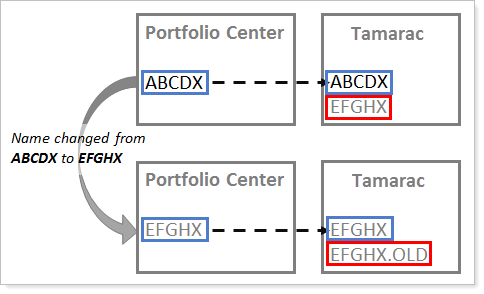
Automatic Duplicate Ticker Name Prevention
When performing a sync, Tamarac uses matching and renaming prevents duplicate naming from occurring.
In the rare instance that a security in Portfolio Center is renamed to a symbol that already exists in Tamarac Reporting, Tamarac Reporting will renames the existing symbol, adding ".OLD" to the symbol name to prevent duplicate tickers.
For example, Security ABCDX exists in Portfolio Center and is synced with Tamarac. Additionally, Tamarac has a security called EFGHX that does not exist in Portfolio Center. If the symbol for security ABCDX is changed to EFGHX, on the next sync, the corresponding Tamarac symbol will be updated. But that creates a duplicate listing for symbol EFGHX in Tamarac. To resolve this, the existing Tamarac security is now called EFGHX.OLD.
Permission Which Roles Can Synchronize Data
Because syncing stops firm users and clients from using Tamarac, your firm's system administrator will want to carefully control who can access the Sync Data From Portfolio Accounting System page.
To add or remove access to this page:
-
On the Setup menu, click User Management.
-
In Manage, choose Roles.
-
Click Edit in the row for role you want to change.
-
Adjust the permissions as desired.
-
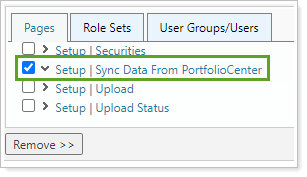
Remove permission. If the role has permission to access the Sync Data From Portfolio Accounting System and you want to remove it, under Pages select the check box next to Setup | Sync Data From Portfolio Center and click Remove >>.
-
Add Permission. If the role does not have permission to access the Sync Data From Portfolio Accounting System page and you want to add it, under Available Pages, select the check box next to Setup | Sync Data From Portfolio Center and click Add >>.

-
-
Click Save.