
Contents
Introduction
The upload feature allows you to add or change a large amount of data at one time. You can use upload to add new data or change existing data in bulk, such as changing the primary advisor and benchmark information for many accounts at once.
Before you upload data, you'll need to format the data to meet data specifications. For more information, see Data Specifications.
When uploading data, you have two options:
-
Upload a file containing the data you want to update in a format such as .csv or .xls.
-
Copy and paste the data directly on the Upload page.
For more information on available upload data sets, see Available Upload Data Sets.
For information about exporting data from Tamarac to edit for an upload, see Understanding Bulk Data Exports.
Upload Best Practices
-
Verify all data before uploading it. Some uploads overwrite existing data rather than adding to existing data.
-
When uploading the Reporting Group Direct Members, Billing Group Accounts, or Households Members upload data sets, the Replace existing billing group accounts, reporting group, and household direct members check box lets you control whether you want to overwrite and replace existing members or add to them.
-
If making changes to a single account or only a few accounts, use the interface, which has little room for error. If updating a large number of accounts, save time by using upload.
-
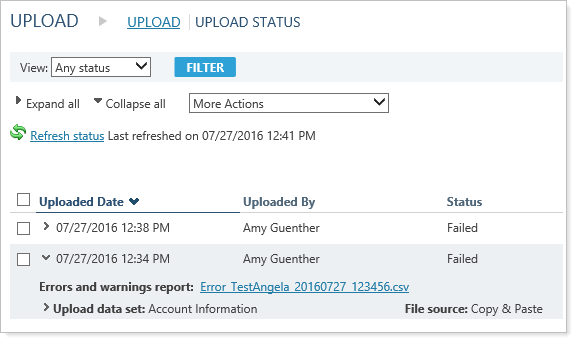
After every upload, check the Upload Status page to ensure no errors or warnings appeared. These errors or warnings could prevent your data from appearing in Tamarac Reporting and should be addressed as soon as possible.
Uploads Data Sets and Bulk Reports
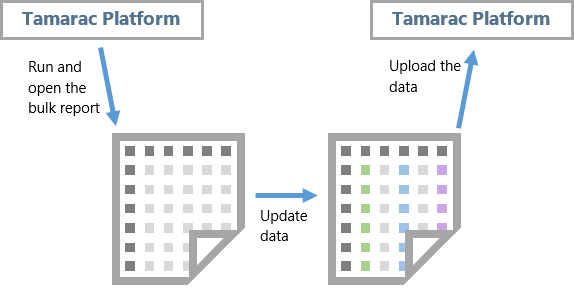
One of the easiest ways to edit large amounts to data is to use bulk reports to extract data, edit it in your spreadsheet program, and then upload it back into Tamarac. For steps on how to upload data, see Upload Bulk Data.
This is the workflow to change existing data:
-
Bulk report.Generate and run a bulk report using the columns you choose. Make sure to include the columns required in the Data Specifications.
-
Update data.Download the CSV file generated and open it in your spreadsheet program. In your spreadsheet program, update the fields that require it.
-
Upload.Upload the updated data from your spreadsheet back into Tamarac Reporting on the Upload page.
important
-
When you upload a blank row for a column, you'll intentionally clear out the data.
-
After every upload, check the Upload Status page to ensure no errors or warnings appeared. These errors or warnings could prevent your data from appearing in Tamarac Reporting and should be addressed as soon as possible.
-
Verify all column header data using Data Specifications to ensure you're uploading the correct fields and field types.
Data Specifications
Data specifications are specific data requirements for each of the data fields you can upload. Upload data sets are made up of these fields, and some fields can be part of multiple upload data sets. For example, many data sets can include a client's account number.

To view the latest data specifications for a specific upload data set, select the desired upload data set in the Add an upload data set list and click Data Specifications.
For more information on each of the upload data sets, see Available Upload Data Sets.
After you've looked at the data specifications for each data set, you can build your Excel file. In the picture below, CASH is being excluded from billing and MSFT is being excluded from performance.

Once you've created the upload file, save it as a CSV file.
After the Upload
The Upload Status page allows you to view details about the uploads you've made to Tamarac Reporting. It also allows you to see if your previous uploads were successful and read any warnings or errors generated due to the uploaded data. You can access the Upload Status page by clicking Upload Status in the Setup menu, under Data Management.
important
After every upload, check the Upload Status page to ensure no errors or warnings appeared. These errors or warnings could prevent your data from appearing in Tamarac Reporting and should be addressed as soon as possible.
Data You Can't Update Using Uploads
The following items can't be updated using the Upload feature:
-
Direct member sort order, Include in PDF, or Master Account ID
-
Advisors (only primary advisor)
-
Manual performance settings
-
Change account number for single accounts
-
Security groups