
Contents
Introduction
| Applies to: | |||
|---|---|---|---|
| ✔ Dynamic | Mobile | ✔ Client Portal | |
If a client has committed capital to a venture capital fund, the client will generally need to make contributions over three to five years to satisfy the terms of the agreement. You can track the payment information in the Committed Capital report.

To track the progress of contributions, you can enter the call dates for the committed capital. After the call date, Tamarac Reporting will look back 10 days for a corresponding transaction amount in the group for the account. The "look back" for the corresponding transaction will allow you to keep the account value intact while cash is in transit between the brokerage account and the private security.
If you want to run the report for a partial ownership account, the committed capital must be assigned directly to the ownership account, and not to the parent account.
For information about how manual security snapshot fields interact with the Committed Capital report, see How Manual Security Snapshot Fields Display on the Committed Capital Report.
Dates on the Committed Capital Report
The Committed Capital report runs from the account inception to the report as-of date. When you set the as-of date on the report, you're setting the end date for the period.
If the report doesn't display the positions you're expecting, review the date range the position was held. The position is considered held in the account starting on the day of the first manual security snapshot transaction and ending on the day of the manual security snapshot transaction that brings the value of the position to zero.
For more information on manual security snapshots, see Manual Securities and Manual Security Snapshots.
Before You Start
In order for a security to appear on the Committed Capital report, you must:
-
Specify the security as a committed capital security.
-
Assign the security to the account.
For detailed steps and information on how to set up committed capital securities, visit Committed Capital Securities.
Why Use the Committed Capital Report?
In the Committed Capital report, you will find options that let you answer many committed capital-related questions, such as:
-
How Much capital Has The Client Committed? Review the amount of capital committed to venture capital funds to plan for those future payments.
-
How Much Capital was Paid as of a Certain Date?Review the amount of capital that was paid as of a certain date, such as the last quarter-end.
-
How Much FEDERAL TAX WAS WITHHELD FROM DISTRIBUTIONS TO DATE? Review the amount of federal tax that was withheld from committed capital distributions to date.
-
How Much Committed capital Remains Outstanding? Evaluate not only capital already paid, but the amount that still remains to be paid.
-
Do the Dividends Paid Correspond With the Rate of Return Stated in the Prospectus? Compare the value of dividends paid on a manual security with the expected rate of return to confirm whether the investment is tracking with what the prospectus claims.
-
How Many Distributions are Automatically Reinvested?Use this report to monitor automatically reinvested distributions. For manual securities, model reinvested distributions that are not flows, ensuring performance calculations remain accurate. The remaining committed capital is adjusted accordingly.
See the Committed Capital Report in Action
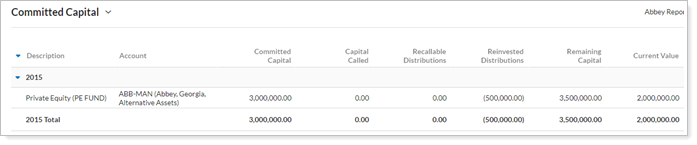
The team at Cherry Street Financial has just updated manual security snapshots based on data from the previous quarter. Advisor Kelly wants to review a client's committed capital now that the snapshots reflect the most updated information. Kelly runs a basic Committed Capital report for this task.
Features of the Committed Capital Report
In the Committed Capital report, you have control over what you see to help you easily identify and evaluate results. Interactive reporting features include the following.
Customize the Data and Display
Display only relevant data. You control what data are displayed and which columns are included, in what order, so you can create the exact report you need.
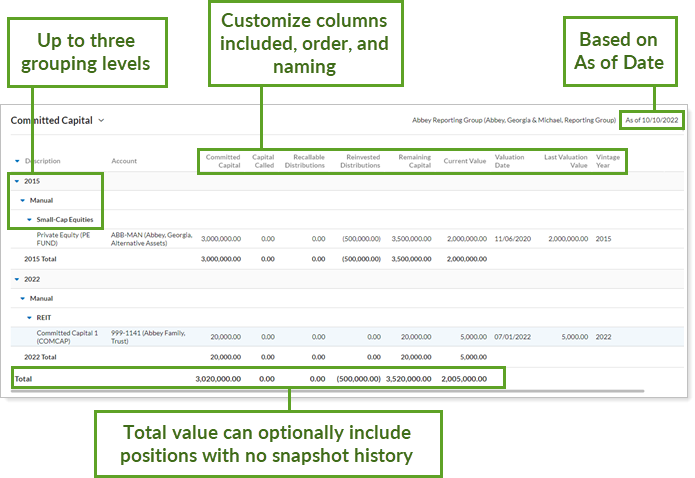
Customize Naming
You can customize the name of most selected columns and the Managed/Unmanaged labels used for the headings and captions.
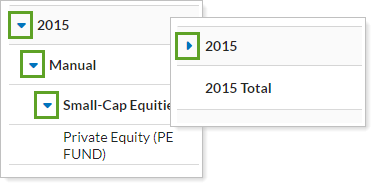
Expand or Collapse Rows
Expand (>) or collapse (˅) table rows to further control the level of detail.
Enhanced Total Row
The total row on the Committed Capital report displays the total IRR and calculates the totals based on all available data. When you select Only include positions held at the end of the period, the positions are hidden but still included in calculations. However, when you clear Include positions with no snapshot history, those positions are excluded from the calculation.
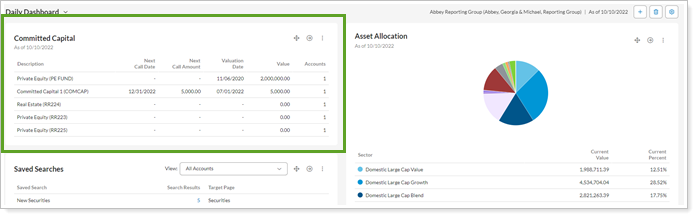
Add Committed Capital to the Reporting Dashboard
You can use dashboard views to see an at-a-glance summary of the main dynamic report on your dashboard.
To learn more about creating and managing dashboard views, see Create and Share Dashboard Views.
For more information on customizing your dashboard, visit Working With Dashboard Modules.
Committed Capital Report Settings
The following settings are available for the Committed Capital report. Click the setting name for more details:
| Setting | Details | Available In... | ||
|---|---|---|---|---|
| Dynamic Report | PDF Report | Reporting Dashboard | ||
| Report Name | Designate a unique name for the report view. | X | X | |
| Mark as Publicly Accessible | Share the report view. | X | ||
| Section Title | Designate what the section will be called in the PDF report. | X | ||
| Theme | Designate what theme the section will use. | X | ||
| Header and Footer | Choose a unique header and footer for the section or use defaults. | X | ||
| Include Page Break After This Section |
Control where page breaks occur in PDF reports. |
X | ||
| Account Grouping | Control grouping of accounts and groups. | X | ||
| As of Date | Select the date you want to use for the report. | X | X | |
| Group By/Then By |
Organize a report by various categories. |
X | X | |
| Show Subtotals |
Add subtotals to each grouping level when you Group by. |
X | X | |
| Unmanaged Asset Treatment |
Choose how you want to treat unmanaged assets on the report. For more information about marking securities as unmanaged and how reports display unmanaged assets, see: |
X | X | |
| Partial Returns |
Choose how to mark data points that have partial returns. |
X | ||
| Show Actual Return Dates |
Show the actual start date for partial period returns. |
X | ||
| Show Position Detail |
Show or hide underlying positions that make up subtotals. |
X | ||
|
Include or exclude a totals row. |
X | |||
| Combine Group Positions |
Combine any common positions held within a selected group. |
X | X | |
| Include Federal Withholdings in Distributions to Date | Include the amount of federal tax withheld from committed capital distributions to date. | X | X | |
| Include Positions With No Snapshot History | Include or exclude committed capital positions that have no transaction history. | X | X | |
| Only Include Positions Held at the End of the Period | Include or exclude committed capital positions that were not held on the As Of Date. | X | X | X |
| Available/Selected Columns | Choose which columns are included, in what order. | X | X | X |
| Show Change For | Set the date range for columns that report on a date period. | X | X | |
| Preview |
See a sample of added columns or rows with the selected settings. |
X | ||
| View Top (Number) Holdings, Sorted By | In the dashboard report, designate how holdings are displayed. | X | ||
Report Actions
To learn more about reports in Tamarac, see Introduction to Reports.
To learn more about how to generate a report, change the data displayed, print or export the report data, and more, see Basics of Working With Reports.
To learn more about creating and using PDF reports, see Understanding PDF Reports and Workflow: Generate a PDF Report.